まえがき
たいていのWindowsの画面の自動操作は以下で紹介した方法で可能になっています。
RPA九人衆による「アカネチャンカワイイヤッタ」の自動化
https://needtec.sakura.ne.jp/wod07672/?p=9204
実は厄介なケースがあって、それはJavaで画面を作っているケースです。
今回はJavaで作られた画面を例に自動操作が可能かどうか検討してみましょう。
実験環境
Windows10 Home
Java 8
Visual Studio 2019
PowerShell 5.1
UiPath 2019.10.0-beta 111
Javaの画面の作成方法
Javaで画面を作成する主な方法としてSwingを使用する場合と、JavaFxを使用する場合があります。
Swingで作成した画面
下記のページを参考に簡単なSwingの画面を作成します。
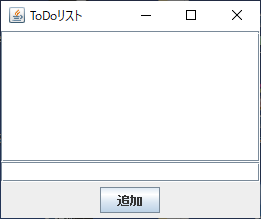
ToDoListPane.java
package SwingSample;
import java.awt.BorderLayout;
import java.awt.event.ActionEvent;
import java.awt.event.ActionListener;

import javax.swing.DefaultListModel;
import javax.swing.JButton;
import javax.swing.JList;
import javax.swing.JPanel;
import javax.swing.JScrollPane;
import javax.swing.JTextField;
/**
* ToDoリスト
* 以下参考
* https://www.atmarkit.co.jp/ait/articles/0609/23/news027.html
*/
public class ToDoListPane extends JPanel {
        private JList<String> toDoList;
        private DefaultListModel<String> toDoListModel;
        private JTextField toDoInputField;
        private JButton addButton;
        public ToDoListPane() {
                super(new BorderLayout());
                // 一覧を生成
                toDoListModel = new DefaultListModel<String>();
                toDoList = new JList<String>(toDoListModel);
                JScrollPane listScrollPane = new   JScrollPane(toDoList);
                // ToDo追加用テキストフィールドの生成
                toDoInputField = new JTextField();
                // 各ボタンの生成
                JPanel buttonPanel = new JPanel();
                addButton = new JButton("追加");
                // ボタンにリスナを設定
                addButton.addActionListener(new    AddActionHandler());
                buttonPanel.add(addButton);
                add(listScrollPane, BorderLayout.NORTH);
                add(toDoInputField, BorderLayout.CENTER);
                add(buttonPanel, BorderLayout.SOUTH);
        }
        /**
        * 追加ボタンアクションのハンドラ
        */
        private class AddActionHandler implements ActionListener {
                public void actionPerformed(ActionEvent e) {
                        // テキストフィールドの内容をリストモデルに追加
                        toDoListModel.addElement
                        (toDoInputField.getText());
                }
        }
}
すべてのコードは以下にあります。
https://github.com/mima3/testjavagui/tree/master/java/Swing001
JavaFxで作成した画面
JavaFxでも単純な画面を作成します。
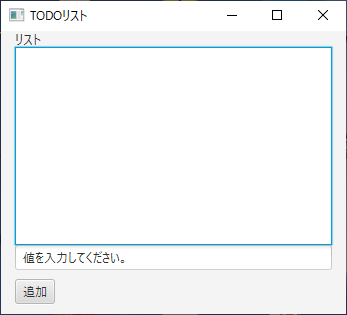
Main.fxml
<?xml version="1.0" encoding="UTF-8"?>

<?import java.lang.*?>
<?import javafx.scene.control.*?>
<?import javafx.scene.layout.*?>
<?import javafx.scene.layout.AnchorPane?>

<AnchorPane xmlns:fx="http://javafx.com/fxml/1" xmlns="http://javafx.com/javafx/2.2" fx:controller="ctrl.Controller">
  <!-- TODO Add Nodes -->
  <children>
    <Pane layoutX="0.0" layoutY="-14.0" prefHeight="297.0" prefWidth="345.0">
      <children>
        <Label layoutX="14.0" layoutY="14.0" text="リスト" />
        <ListView id="" fx:id="list" layoutX="14.0" layoutY="30.0" prefHeight="198.0" prefWidth="317.0" />
        <Button id="" fx:id="btnAdd" layoutX="14.0" layoutY="262.0" mnemonicParsing="false" onAction="#onAddButtonClicked" text="追加" />
        <TextField id="" fx:id="textBox" layoutX="14.0" layoutY="228.0" prefHeight="15.9609375" prefWidth="317.0" />
      </children>
    </Pane>
  </children>
</AnchorPane>
Controler.java
package ctrl;
import java.net.URL;
import java.util.ResourceBundle;

import javafx.event.ActionEvent;
import javafx.fxml.FXML;
import javafx.fxml.Initializable;
import javafx.scene.control.Button;
import javafx.scene.control.ListView;
import javafx.scene.control.TextField;

public class Controller implements Initializable {
    @FXML
    private TextField textBox;

    @FXML
    private Button btnAdd;

    @FXML
    private ListView<String> list;

    @Override
    public void initialize(URL location, ResourceBundle resources) {
        // TODO 自動生成されたメソッド・スタブ
        textBox.setText("値を入力してください。");

    }

    @FXML
    public void onAddButtonClicked(ActionEvent event) {
        // テキストボックスに文字列をセットする
        list.getItems().add(textBox.getText());
        textBox.setText("");
    }
}
すべてのコードは以下にあります。
https://github.com/mima3/testjavagui/tree/master/java/Java8Fx001
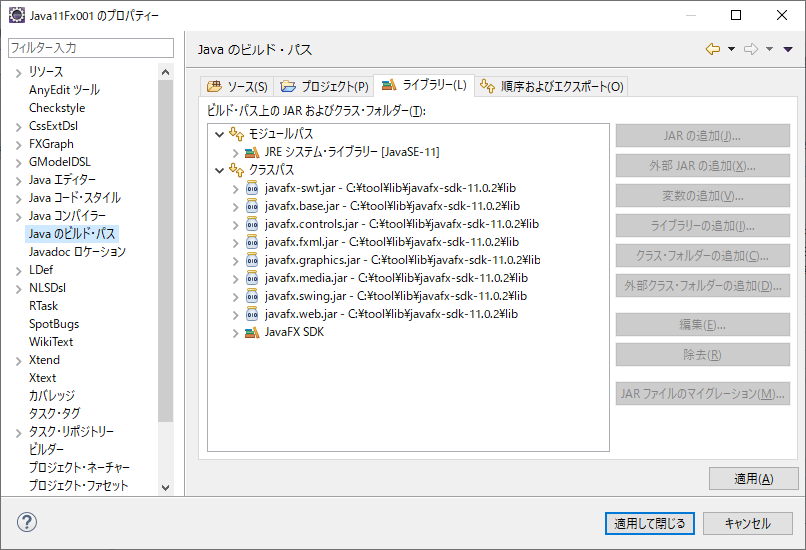
Java11でJavaFxの画面を作る場合の注意
JavaFXはJDK 11以降、Oracle JDKから分離されます。そのためJavaFxの画面を作る場合、以下のような手順が必要になります。
(1)JavaFXをダウンロードする。
https://gluonhq.com/products/javafx/
(2)ダウンロードしたフォルダ中のlibの中のjarをプロジェクトの参照ライブラリに追加する。
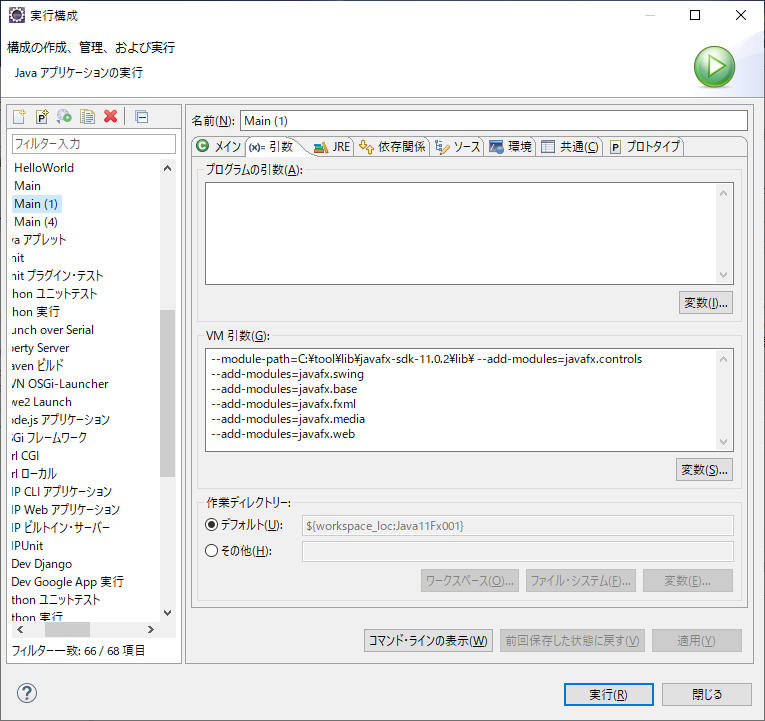
(3)実行時
コマンドラインから実行する場合
C:\pleiades201904\java\11\bin\java --module-path=C:\tool\lib\javafx-sdk-11.0.2\lib\ --add-modules=javafx.controls --add-modules=javafx.swing --add-modules=javafx.base --add-modules=javafx.fxml --add-modules=javafx.media --add-modules=javafx.web -jar Java11Fx.jarEclipseで実行する場合の実行構成
UIAutomationの自動操作
作成したJavaの画面をinspect.exeを使用してUIAutomation経由で操作できるかを確認します。
Swingの場合:
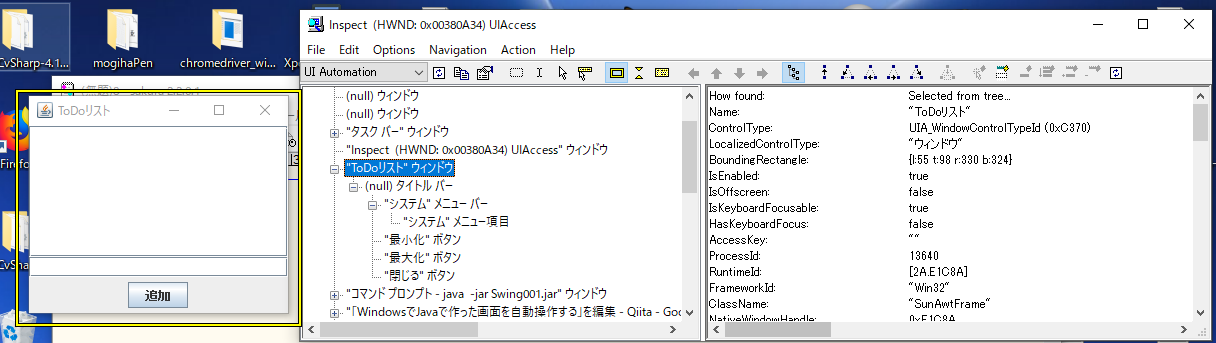
UIAutomationでコントロールの情報が取得されていないことが確認できます。つまりSwingで作成したアプリケーションはUIAutomation経由で操作が不可能です。
JavaFxの場合:
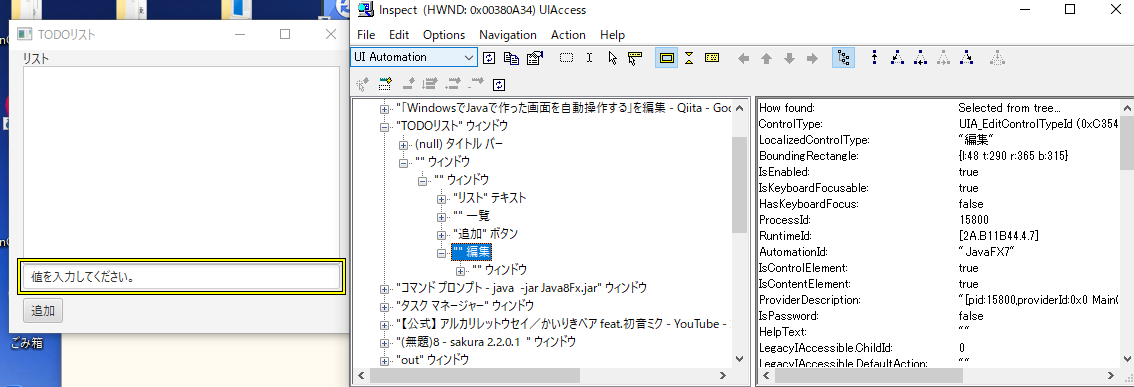
UIAutomationの要素が取得されており、ControlTypeも適切に設定されていることが確認できます。
実際にPowerShellを使用して自動操作をしてみましょう。
Add-Type -AssemblyName UIAutomationClient
Add-Type -AssemblyName UIAutomationTypes
Add-type -AssemblyName System.Windows.Forms

$source = @"
using System;
using System.Windows.Automation;
using System.Runtime.InteropServices;
using System.Windows.Forms;
using System.Drawing;

public class AutomationHelper
{
    // https://culage.hatenablog.com/entry/20130611/1370876400
    [DllImport("user32.dll")]
    extern static uint SendInput(uint nInputs, INPUT[] pInputs, int cbSize);

    [StructLayout(LayoutKind.Sequential)]
    struct INPUT
    {
        public int type;
        public MOUSEINPUT mi;
    }

    [StructLayout(LayoutKind.Sequential)]
    struct MOUSEINPUT
    {
        public int dx;
        public int dy;
        public int mouseData;
        public int dwFlags;
        public int time;
        public IntPtr dwExtraInfo;
    }

    const int MOUSEEVENTF_LEFTDOWN = 0x0002;
    const int MOUSEEVENTF_LEFTUP = 0x0004;
    static public void Click()
    {
        //struct 配列の宣言
        INPUT[] input = new INPUT[2];
        //左ボタン Down
        input[0].mi.dwFlags = MOUSEEVENTF_LEFTDOWN;
        //左ボタン Up
        input[1].mi.dwFlags = MOUSEEVENTF_LEFTUP;
        //イベントの一括生成
        SendInput(2, input, Marshal.SizeOf(input[0]));
    }
    static public void MouseMove(int x, int y)
    {
        var pt = new System.Drawing.Point(x, y);
        System.Windows.Forms.Cursor.Position = pt;
    }
    static public void SendKeys(string key)
    {
        System.Windows.Forms.SendKeys.SendWait(key);
    }
    public static AutomationElement RootElement
    {
        get
        {
            return AutomationElement.RootElement;
        }
    }

    public static AutomationElement GetMainWindowByTitle(string title) {
        PropertyCondition cond = new PropertyCondition(AutomationElement.NameProperty, title);
        return RootElement.FindFirst(TreeScope.Children, cond);
    }

    public static AutomationElement ChildWindowByTitle(AutomationElement parent , string title) {
        try {
            PropertyCondition cond = new PropertyCondition(AutomationElement.NameProperty, title);
            return parent.FindFirst(TreeScope.Children, cond);
        } catch {
            return null;
        }
    }

    public static AutomationElement WaitChildWindowByTitle(AutomationElement parent, string title, int timeout = 10) {
        DateTime start = DateTime.Now;
        while (true) {
            AutomationElement ret = ChildWindowByTitle(parent, title);
            if (ret != null) {
                return ret;
            }
            TimeSpan ts = DateTime.Now - start;
            if (ts.TotalSeconds > timeout) {
               return null;
            }
            System.Threading.Thread.Sleep(100);
        }
    }
}
"@
Add-Type -TypeDefinition $source -ReferencedAssemblies("UIAutomationClient", "UIAutomationTypes", "System.Windows.Forms",  "System.Drawing")

# 5.0以降ならusingで記載した方が楽。
$autoElem = [System.Windows.Automation.AutomationElement]

# ウィンドウ以下で指定の条件に当てはまるコントロールを全て列挙
function findAllElements($form, $condProp, $condValue) {
    $cond = New-Object -TypeName System.Windows.Automation.PropertyCondition($condProp, $condValue)
    return $form.FindAll([System.Windows.Automation.TreeScope]::Element -bor [System.Windows.Automation.TreeScope]::Descendants, $cond)
}

# ウィンドウ以下で指定の条件に当てはまるコントロールを1つ取得
function findFirstElement($form, $condProp, $condValue) {
    $cond = New-Object -TypeName System.Windows.Automation.PropertyCondition($condProp, $condValue)
    return $form.FindFirst([System.Windows.Automation.TreeScope]::Element -bor [System.Windows.Automation.TreeScope]::Descendants, $cond)
}

# 要素をValuePatternに変換
function convertValuePattern($elem) {
    return $elem.GetCurrentPattern([System.Windows.Automation.ValuePattern]::Pattern) -as [System.Windows.Automation.ValuePattern]
}
function convertSelectionItemPattern($elem) {
    return $elem.GetCurrentPattern([System.Windows.Automation.SelectionItemPattern]::Pattern) -as [System.Windows.Automation.SelectionItemPattern]
}

# 要素にテキストを入力
# Java8だとtxtValuePtn.SetValueが正常に動作しないための代替
function sendTextValue($textCtrl, $message) {
    [AutomationHelper]::MouseMove($textCtrl.Current.BoundingRectangle.X + 5, $textCtrl.Current.BoundingRectangle.Y + 5)
    [AutomationHelper]::Click()
    [AutomationHelper]::SendKeys("^(a)")
    [AutomationHelper]::SendKeys("{DEL}")
    [AutomationHelper]::SendKeys($message)
    Start-Sleep 1
}

# メイン処理
$mainForm = [AutomationHelper]::GetMainWindowByTitle("TODOリスト")
if ($mainForm -eq $null) {
    Write-Error "Java Fxの画面を起動してください"
    exit 1
}
$mainForm.SetFocus()
$editType = [System.Windows.Automation.ControlType]::Edit
$textCtrl = findFirstElement $mainForm $autoElem::ControlTypeProperty $editType

# Java8の場合ValuePatternのSetValueでエラーとなる
# $txtValuePtn = convertValuePattern $textCtrl
# $txtGetValue = $txtValuePtn.Current.Value
# Write-Host "変更前:$txtGetValue"
# $txtValuePtn.SetValue("わふる");

sendTextValue $textCtrl "わっふる"

$btnCtrl = findFirstElement $mainForm $autoElem::NameProperty "追加"
$btnInvoke = $btnCtrl.GetCurrentPattern([System.Windows.Automation.InvokePattern]::Pattern) -as [System.Windows.Automation.InvokePattern]
$btnInvoke.Invoke()

# 2文字目
sendTextValue $textCtrl "猫"
$btnInvoke.Invoke()

# 3文字目
sendTextValue $textCtrl "犬"
$btnInvoke.Invoke()

# リスト選択
$listitemType = [System.Windows.Automation.ControlType]::ListItem
$listitems = findAllElements $mainForm $autoElem::ControlTypeProperty $listitemType
$listPtn = convertSelectionItemPattern $listitems[1]
$listPtn.Select()
実行結果
これを実行するとJava11のJavaFxを使用した画面は正常に完了しますが、Java8のJavaFxを使用した画面は下記のエラーを出力します。
JavaFxをUIAutomationでの操作時のエラー
Java8で作成したJavaFxに対してUiAutomationのValuePatternで値を設定すると下記のエラーが出ます。
PowerShell側
"1" 個の引数を指定して "SetValue" を呼び出し中に例外が発生しました: ""
発生場所 C:\dev\testjavagui\out\javafx_auto_err.ps1:146 文字:1
+ $txtValuePtn.SetValue("わふる");
+ ~~~~~~~~~~~~~~~~~~~~~~~~~~~~
    + CategoryInfo          : NotSpecified: (:) [], MethodInvocationException
    + FullyQualifiedErrorId : COMException
Java側
Exception in thread "JavaFX Application Thread" java.lang.ClassCastException: java.lang.String cannot be cast to java.lang.Integer
        at javafx.scene.control.TextInputControl.executeAccessibleAction(TextInputControl.java:1590)
        at javafx.scene.Node$19.executeAction(Node.java:9649)
        at com.sun.glass.ui.Accessible$ExecuteAction.run(Accessible.java:177)
        at com.sun.glass.ui.Accessible$ExecuteAction.run(Accessible.java:173)
        at java.security.AccessController.doPrivileged(Native Method)
        at com.sun.glass.ui.Accessible.lambda$executeAction$5(Accessible.java:190)
        at com.sun.javafx.tk.quantum.QuantumToolkit.runWithoutRenderLock(QuantumToolkit.java:389)
        at com.sun.glass.ui.Accessible.executeAction(Accessible.java:187)
        at com.sun.glass.ui.win.WinAccessible.SetValueString(WinAccessible.java:1262)
        at com.sun.glass.ui.win.WinApplication._runLoop(Native Method)
        at com.sun.glass.ui.win.WinApplication.lambda$null$152(WinApplication.java:177)
        at java.lang.Thread.run(Thread.java:748)
このエラーはJava11で作成したJavaFxの場合は発生しません。
Java Access Bridgeを使用した自動操作
Java Access Bridgeを使用することでWindowsはJavaのGUIを操作することが可能になります。
JavaやJava Access Bridgeを使用するプロセスが32bitか64bitかは意識して使用するようにしてください。
Java Access Bridgeを使用したGUI要素の探索
最初にJava Access Bridgeを使用したGUI要素の探索ツールであるAccess Bridge Explorerの使用方法について説明します。
(1)Java Access Bridgeを有効にする
%JRE_HOME%\bin\jabswitch -enable(2)%JRE_HOME%\jre\binにWindowsAccessBridge-64.dllが存在することを確認し、環境変数PATHに %JRE_HOME%\jre\binを追加する。
古いバージョンだときは下記からダウンロードする必要がある。
https://www.oracle.com/technetwork/java/javase/tech/index-jsp-136191.html
(3)下記からAccess Bridge Explorerをダウンロードする。
https://github.com/google/access-bridge-explorer/releases
(4)Access Bridge Explorerを起動する。
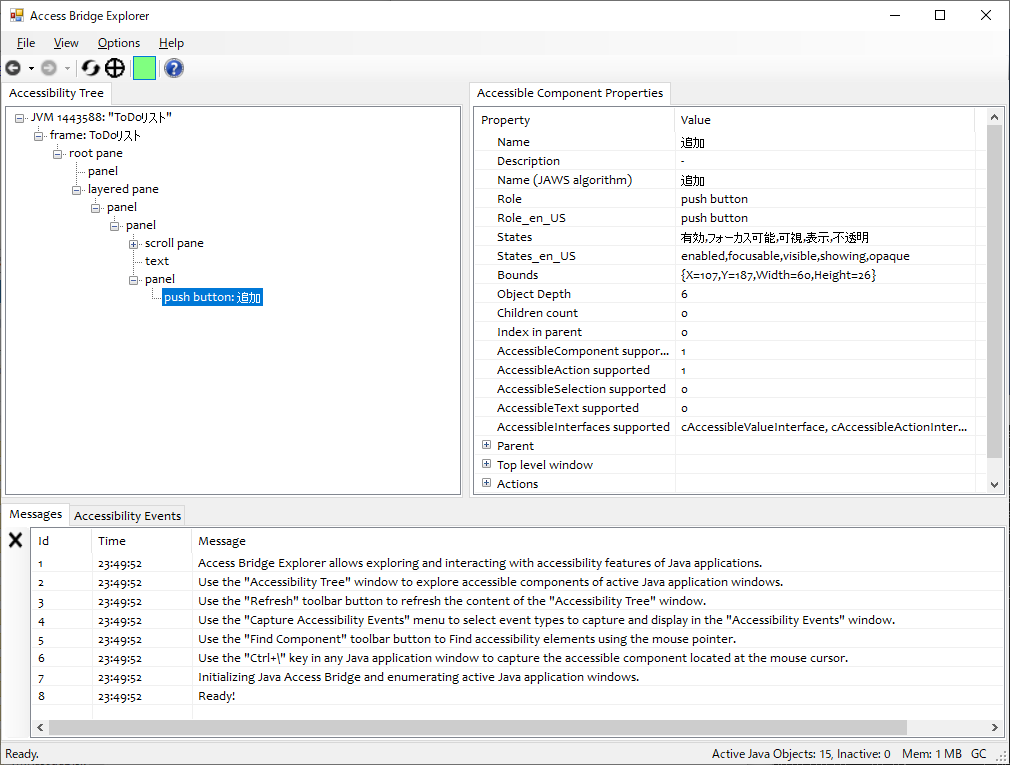
※Java Access BridgeではSwingで作成した画面しか操作できません。JavaFxで作成した画面を操作することは不可能です。
.NETからのJava Access Bridgeの操作
.NETからJava Access Bridgeを操作するサンプルは下記に公開されていました。
https://github.com/jdog3/JavaAccessBridge.Net-Sample
上記を基にクリック操作やコンソールアプリからの操作を可能したサンプルが以下になります。
https://github.com/mima3/testjavagui/tree/master/cs
using JabApiLib.JavaAccessBridge;
using System;
using System.Collections.Generic;
using System.Text;

namespace JabApiCsharpSample
{
    class Program
    {
        static void Main(string[] args)
        {
            //JabApi.Windows_run();
            JabHelpers.Init();
            int vmID = 0;
            JabHelpers.AccessibleTreeItem javaTree = null;
            javaTree = JabHelpers.GetComponentTreeByTitle("ToDoリスト", out vmID);

            // テキスト設定
            JabHelpers.AccessibleTreeItem txt = javaTree.children[0].children[1].children[0].children[0].children[1];
            JabApi.setTextContents(vmID, txt.acPtr, "わろすわろす");

            JabHelpers.AccessibleTreeItem button = javaTree.children[0].children[1].children[0].children[0].children[2].children[0];
            List<string> actionList = JabHelpers.GetAccessibleActionsList(vmID, button.acPtr);
            Console.WriteLine("操作可能なアクション-------------");
            foreach (string a in actionList)
            {
                Console.WriteLine(a);
            }
            // クリック実行
            JabHelpers.DoAccessibleActions(vmID, button.acPtr, "クリック");

            //
            JabApi.setTextContents(vmID, txt.acPtr, "いろはにほへと");
            JabHelpers.DoAccessibleActions(vmID, button.acPtr, "クリック");

            //
            JabApi.setTextContents(vmID, txt.acPtr, "ちりぬるお");
            JabHelpers.DoAccessibleActions(vmID, button.acPtr, "クリック");

            // リストの内容
            Console.WriteLine("リスト一覧-------------");
            javaTree = JabHelpers.GetComponentTreeByTitle("ToDoリスト", out vmID);
            JabHelpers.AccessibleTreeItem list = javaTree.children[0].children[1].children[0].children[0].children[0].children[0].children[0];
            foreach (JabHelpers.AccessibleTreeItem listitem in list.children)
            {
                Console.WriteLine(listitem.name );
            }
            JabHelpers.DoAccessibleActions(vmID, list.children[1].acPtr, "クリック");
            Console.ReadLine();
        }
    }
}
DoAccessibleActionsで実行可能な操作はコントロール毎にことなり、なにができるかは、GetAccessibleActionsで調べることができます。
JabApiではJava Access BridgeのAPIを呼び出す関数を纏めて実装してあります。
今回は64ビットで動作していることを前提としているので必要に応じてJabApi.csの下記の行を変更してください。
    public static class JabApi
    {

        public const String WinAccessBridgeDll = @"WindowsAccessBridge-64.dll";
なお、Java Access Bridgeの初期処理にあたるWindows_runはメッセージポンプを必要としており、メッセージが処理されないと後続の処理が正常に動作しません。
大元になった.NETからJava Access Bridge操作サンプルでFormLoad時にWindows_runを入れなければならいと言っているのはこのためです。
今回はコンソールで動作するように以下のようにWindows_run後にDoEventsを実行するようにしました。
        // Windows_runはメッセージポンプが必要
        // https://stackoverflow.com/questions/50582769/windowsaccessbridge-for-java-automation-using-c-sharp
        public static void Init()
        {
            JabApi.Windows_run();
            DoEvents();
        }
実行結果
PowerShellでの例
C#を基にPowerShellでも同じ操作を行うスクリプトが記述できます。
使用しているJabApi.dllはダウンロードするかソースコードからコンパイルしてください。
GitHubに挙げたDLLは64bit+.NET2.0なので環境によっては使用できません。
# 64bit前提
$dllPath = Split-Path $MyInvocation.MyCommand.Path
Set-Item Env:Path "$Env:Path;$dllPath"
Add-Type -Path "$dllPath\JabApi.dll"
[JabApiLib.JavaAccessBridge.JabHelpers]::init()
$vmID = 0
$javaTree = [JabApiLib.JavaAccessBridge.JabHelpers]::GetComponentTreeByTitle("ToDoリスト",[ref]$vmID)
$txt = $javaTree.children[0].children[1].children[0].children[0].children[1]
[JabApiLib.JavaAccessBridge.JabApi]::setTextContents($vmID, $txt.acPtr, "わろすわろす")

# クリック
$button = $javaTree.children[0].children[1].children[0].children[0].children[2].children[0]
[JabApiLib.JavaAccessBridge.JabHelpers]::DoAccessibleActions($vmID, $button.acPtr, "クリック")

#
[JabApiLib.JavaAccessBridge.JabApi]::setTextContents($vmID, $txt.acPtr, "あああああ")
[JabApiLib.JavaAccessBridge.JabHelpers]::DoAccessibleActions($vmID, $button.acPtr, "クリック")

#
[JabApiLib.JavaAccessBridge.JabApi]::setTextContents($vmID, $txt.acPtr, "いいいいい")
[JabApiLib.JavaAccessBridge.JabHelpers]::DoAccessibleActions($vmID, $button.acPtr, "クリック")

# 更新の確認
$javaTree = [JabApiLib.JavaAccessBridge.JabHelpers]::GetComponentTreeByTitle("ToDoリスト",[ref]$vmID)
$list = $javaTree.children[0].children[1].children[0].children[0].children[0].children[0].children[0]
foreach($item in $list.children) {
  Write-Host $item.name
}
[JabApiLib.JavaAccessBridge.JabHelpers]::DoAccessibleActions($vmID, $list.children[1].acPtr, "クリック")
UIPathの場合
ツールからJava拡張機能をインストールすることでJavaのGUI操作が可能になります。
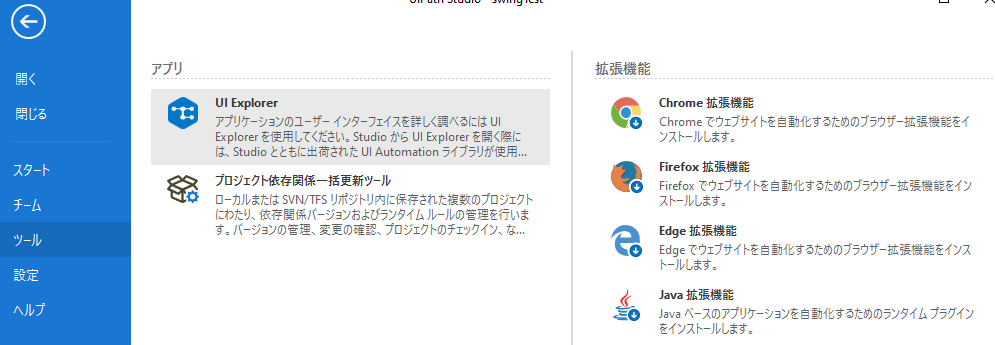
拡張機能をインストールすると「%JRE_HOME%\bin\」にUiPathJavaBridgeV8_x64.dllが、格納されます。
拡張機能をインストールすると、いつも通りに画面が作成できるようになります。
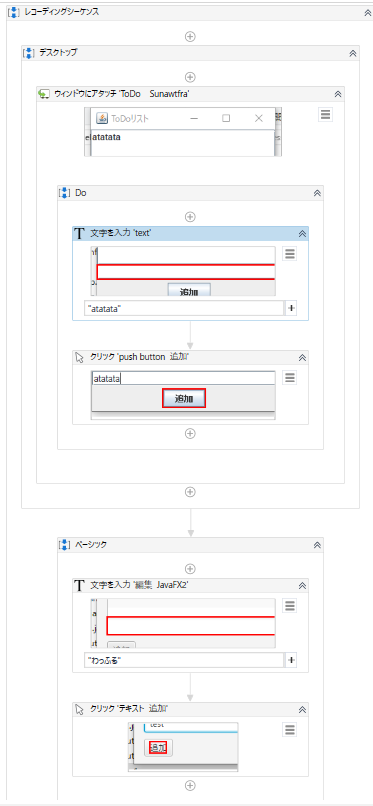
実行結果
その他の選択肢
GUIのテストフレームワークを利用して自動操作がおこなえるかもしれません。
今回の目的と違っていたので、詳しくは調べていません。
Automation
AutomationはSwingとJavaFxのGUIを簡単にテストできるフレームワークです。
Javaで記載することもできますが、下記のようなGroovyのスクリプトで記載することも可能です。
clickOn 'text:Some Button'
doubleClickOn 'username-input'
type 'my-username'
clickOn 'text:Login'
TestFX
JavaFXのシンプルでクリーンなテストフレームワークです。
https://github.com/TestFX/TestFX
AssertJ Swing
AssertJ SwingはSwingのGUIのテストが可能のようです。
今はFest Swingをフォークしたものになります。
Java Swing UI test driver replacement for Fest [closed]
https://stackoverflow.com/questions/31168990/java-swing-ui-test-driver-replacement-for-fest
参考
- SwingのキホンJFrameを使う
- Javafx Listview Add and edit element
- How do I use JavaFX 11 in Eclipse?
- OpenJFX + OpenJDK で JavaFX を動かす
- Ubuntu18.4でjava11とjavaFxの環境を整える
- 【超初心者向け】JavaFX超入門
- Java Access Bridge Architecture
- Java Swing UI test driver replacement for Fest [closed]
- Automation
- Two simple tools to let you test your Swing/JavaFX applications easily
- TestFx
- WindowsAccessBridge for Java Automation using C#