キサマはHello Worldを嘗めたッッッ
プログラミング言語を始める場合に「Hello World」と出力することはよくあります。
特に業務で使わないといけなくなった場合だとゴキブリダッシュばりの速度でHelloWorldを書いて次の段階に進もうとします。
だが、私はこのHello Worldが、どう動いていたのか理解していたのでしょうか。
今回は、烈先生に「キサマはHello Worldを嘗めたッッッ」とボコられない程度に初心に戻ってHello Worldを見なおしてみようと思います。
ゴキブリダッシュ的 Hello World
環境
Windows 10
java version "1.8.0_202"
Java(TM) SE Runtime Environment (build 1.8.0_202-b08)
Java HotSpot(TM) 64-Bit Server VM (build 25.202-b08, mixed mode)
Helloworldの作成~実行
いつものようにHello Worldを作成して実行します。
まずテキストエディタでjavaのコードを作成します。
HelloWorld.java
public class HelloWorld {
    public static void main(String[] args) {
        System.out.println("Hello World");
    }
}
作成したjavaファイルを入力としてjavacコマンドを実行してclassファイルを作成します。
今回は「-g:none」オプションを付けてデバッグ情報は生成しないようにします。
javac -g:none HelloWorld.java作成した「HelloWorld.class」をjavaコマンドで実行します。
>java HelloWorld
Hello World
「Hello World」と出力されました。
cやc++で作成した実行ファイルと異なり、作成したHelloWorld.classはJavaが入っている環境であれば、WindowsでもMacでもLinuxでも同様に動作します。
いやー、Javaって便利ですね。
終わり!!閉廷!!以上!!皆解散!!
そんなふうに考えていた時期が俺にもありました
いままではそれで終わらせてました。
そう、このHelloWorld.classがどういうファイルなのかを考える機会がなかったのです。
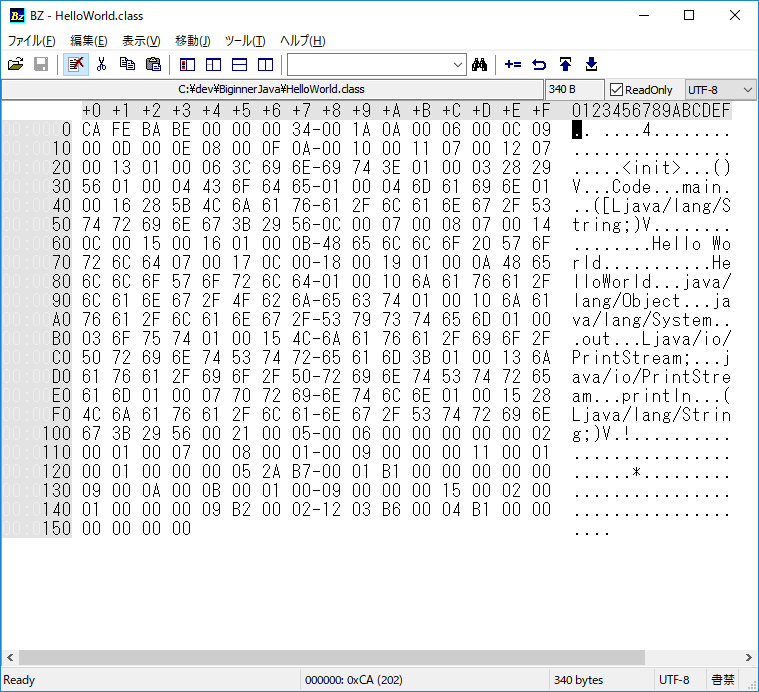
今回はせっかくなので、作成されたバイナリファイルの内容を確認してみます。
HelloWorld.classの中身は以下のようなバイナリになっています。
このバイナリファイルを読み解くには、「The Java® Virtual Machine Specification」を読む必要があります。
https://docs.oracle.com/javase/specs/jvms/se8/html/index.html
今回使用するJVM仕様
今回使用するJVMの仕様を簡単に記載しますが、さっさとクラスファイルのバイナリを解析をしたい人はスキップしてください。
classファイルの構造は以下の通りです。
ClassFile {
    u4             magic;
    u2             minor_version;
    u2             major_version;
    u2             constant_pool_count;
    cp_info        constant_pool[constant_pool_count-1];
    u2             access_flags;
    u2             this_class;
    u2             super_class;
    u2             interfaces_count;
    u2             interfaces[interfaces_count];
    u2             fields_count;
    field_info     fields[fields_count];
    u2             methods_count;
    method_info    methods[methods_count];
    u2             attributes_count;
    attribute_info attributes[attributes_count];
}
u1は1バイト、u2は2バイト、u4は4バイトのデータを表します。
その他については構造体なので都度説明します。
magic はクラスファイルフォーマットを識別するマジックナンバーで、「0xCAFEBABE」です。
なお、このマジックナンバーの由来はCAFEBABE: Java's Magic Wordに記載されているので、一読しておくとデートの時に使ってドン引かれます。
minor_version、major_versionはこのクラスファイルのマイナーバージョン番号とメジャーバージョン番号です。メジャーバージョン番号とマイナーバージョン番号によって、クラスファイル形式のバージョンが決まります。
constant_pool[]とconstant_pool_countは文字列定数、クラス名およびインタフェース名、フィールド名、その他の定数を表す構造体のテーブルとその数です。
constant_poolへのインデックスは1~constant_pool_count-1が有効範囲になります。
access_flagsは以下のフラグの組み合わせになります。
| フラグ名 | 値 | 解釈 |
|---|---|---|
| ACC_PUBLIC | 0x0001 | publicが宣言されています。そのパッケージの外部からアクセスすることができます。 |
| ACC_FINAL | 0x0010 | finalが宣言されています。サブクラスは許可されていません。 |
| ACC_SUPER | 0x0020 | invokespecial命令によって呼び出されたときに、スーパークラスメソッドを特別に扱います。 |
| ACC_INTERFACE | 0x0200 | クラスではなくインタフェースです。 |
| ACC_ABSTRACT | 0x0400 | abstractを宣言されています。インスタンス化してはいけません。 |
| ACC_SYNTHETIC | 0x1000 | コンパイラによって生成されたものであることをしめします。※例えばクラス内にクラスを作成したときに作成されるクラスファイル(ex. Hello$Test.class)に付与されていました |
| ACC_ANNOTATION | 0x2000 | アノテーションとして宣言されています。 |
| ACC_ENUM | 0x4000 | enum型として宣言されています。 |
this_class はconstant_pool[]中の有効なインデックス値である必要があります。インデックスで参照されるデータは当該ファイルで指定されたクラスの情報を保持するCONSTANT_Class_info構造体である必要があります。
super_class は0またはconstant_pool[]中の有効なインデックス値である必要があります。インデックスで参照されるデータはこのクラスファイルで定義されたクラスの直接のスーパークラスを表すCONSTANT_Class_info構造体である必要があります。
interfaces_count、interfaces[]はこのクラスファイルで定義されているクラスのインターフェイスを表すCONSTANT_Class_info構造体へのインデックスの配列になっています。インターフェイスがない場合はinterfaces_countは0となり、interfaces[]は存在しません。
fields_count、fields[]はこのクラスファイルで定義されているクラスのフィールドを表すfield構造体の配列になっています。フィールドがない場合はfields_countは0となり、fields[]は存在しません。
methods_count、methods[]はこのクラスファイルで定義されているクラスのメソッドを表すmethod構造体の配列になっています。フィールドがない場合はmethods_countは0となり、methods[]は存在しません。
attributes_count、attributes[]はこのクラスファイルで定義されているクラスにつての属性情報を表すattribute構造体の配列になっています。
constant_pool
この構造体は1バイトのタグでどのような構造体になるかが決定されます。
| Constant Type | Value |
|---|---|
| CONSTANT_Class | 7 |
| CONSTANT_Fieldref | 9 |
| CONSTANT_Methodref | 10 |
| CONSTANT_InterfaceMethodref | 11 |
| CONSTANT_String | 8 |
| CONSTANT_Integer | 3 |
| CONSTANT_Float | 4 |
| CONSTANT_Long | 5 |
| CONSTANT_Double | 6 |
| CONSTANT_NameAndType | 12 |
| CONSTANT_Utf8 | 1 |
| CONSTANT_MethodHandle | 15 |
| CONSTANT_MethodType | 16 |
| CONSTANT_InvokeDynamic | 18 |
以下で今回使用する分は説明するので、その他の構造体については以下を参照してください。
https://docs.oracle.com/javase/specs/jvms/se8/html/jvms-4.html#jvms-4.4-140
CONSTANT_Class
クラスまたはインタフェースを表すために使用されます。
CONSTANT_Class_info {
    u1 tag;
    u2 name_index;
}
tagにはCONSTANT_Classをあらわす7が格納されます。
name_index項目の値は constant_poolテーブル中のCONSTANT_Utf8_info構造体へのインデックスになります。
CONSTANT_Fieldref
CONSTANT_Fieldref_info {
    u1 tag;
    u2 class_index;
    u2 name_and_type_index;
}
tagにはCONSTANT_Fieldref_info値をあらわす9が格納されます。
class_indexの値はconstant_poolテーブル中のCONSTANT_Class_info構造体へのインデックスです。
name_and_type_index項目 の値はconstant_poolテーブル中のCONSTANT_NameAndType_info構造体へのインデックスです。
CONSTANT_Methodref
CONSTANT_Methodref_info {
    u1 tag;
    u2 class_index;
    u2 name_and_type_index;
}
tagにはCONSTANT_Methodref値をあらわす10が格納されます。
class_indexの値はconstant_poolテーブル中のCONSTANT_Class_info構造体へのインデックスです。
name_and_type_index項目 の値はconstant_poolテーブル中のCONSTANT_NameAndType_info構造体へのインデックスです。
CONSTANT_String
CONSTANT_String_info {
    u1 tag;
    u2 string_index;
}
tagにはCONSTANT_String値をあらわす8が格納されます。
string_indexの値はconstant_poolテーブル中のCONSTANT_Utf8_info構造体へのインデックスです。
CONSTANT_NameAndType
フィールドまたはメソッドを表すために使用されます。ただし、それが属するクラスまたはインタフェースの型は示されません。
CONSTANT_NameAndType_info {
    u1 tag;
    u2 name_index;
    u2 descriptor_index;
}
tagにはCONSTANT_NameAndType値をあらわす12が格納されます。
name_index項目の値はconstant_pool中のCONSTANT_Utf8_info構造体への有効なインデックスでなければなりません。
CONSTANT_Utf8
CONSTANT_Utf8_info {
    u1 tag;
    u2 length;
    u1 bytes[length];
}
tagにはCONSTANT_Utf8値をあらわす1が格納されます。
lengthにはbytes配列内のバイト数を表します(文字列の長さではありません)
byte配列には文字列のバイトが含まれます。また終端文字は含まれません。この文字列の詳細については下記を参照してください。
https://docs.oracle.com/javase/specs/jvms/se8/html/jvms-4.html#jvms-4.4.7
method構造体
method_info {
    u2 access_flags;
    u2 name_index;
    u2 descriptor_index;
    u2 attributes_count;
    attribute_info attributes [attributes_count];
}
access_flags項目の値はこのメソッドへのアクセス許可とこのメソッドのプロパティを示すために使用されるフラグの組み合わせです。
| フラグ名 | 値 | 説明 |
|---|---|---|
| ACC_PUBLIC | 0x0001 | publicを宣言されました。そのパッケージの外部からアクセスすることができます。 |
| ACC_PRIVATE | 0x0002 | privateを宣言しました。定義クラス内でのみアクセス可能です。 |
| ACC_PROTECTED | 0x0004 | protectedを宣言しました。サブクラス内でアクセスできます。 |
| ACC_STATIC | 0x0008 | staticを宣言しました。 |
| ACC_FINAL | 0x0010 | finalを宣言しました。上書きされてはならない。 |
| ACC_SYNCHRONIZED | 0x0020 | synchronizedを宣言しました。 |
| ACC_BRIDGE | 0x0040 | Javaプログラミング言語用のコンパイラによって生成されたブリッジメソッドを示すために使用されます。Java Generics - Bridge method?を参照してください。 |
| ACC_VARARGS | 0x0080 | 可変数の引数で宣言されています。 |
| ACC_NATIVE | 0x0100 | nativeを宣言しました。Java以外の言語で実装されている。 |
| ACC_ABSTRACT | 0x0400 | abstractを宣言しました。実装は提供されていません。 |
| ACC_STRICT | 0x0800 | strictfpを宣言しました。 |
| ACC_SYNTHETIC | 0x1000 | コンパイラによって生成されたソースコードに表示されないことを示しています。 |
name_indexの値はconstant_poolテーブル中のCONSTANT_Utf8_info構造体へのインデックスです。メソッド名または
descriptor_indexの値はconstant_poolテーブル中のCONSTANT_Utf8_info構造体へのインデックスです。メソッド記述子が格納されています。
attributes_count、attributes[]はこのクラスファイルで定義されているクラスにつての属性情報を表すattribute構造体の配列になっています。
attribute構造体
この構造体は属性によって構造体の形が変わります。共通的な形式は以下のようになります。
attribute_info {
    u2 attribute_name_index;
    u4 attribute_length;
    u1 info [attribute_length];
}attribute_name_indexの値はconstant_poolテーブル中のCONSTANT_Utf8_info構造体へのインデックスです。
attribute_lengthは後続の情報の長さをバイト数であらわします。
infoについては属性ごとにことなります。
| 属性 | Location | |
|---|---|---|
| SourceFile | ClassFile | |
| InnerClasses | ClassFile | |
| EnclosingMethod | ClassFile | |
| SourceDebugExtension | ClassFile | |
| BootstrapMethods | ClassFile | |
| ConstantValue | field_info | |
| Code | method_info | |
| Exceptions | method_info | |
| RuntimeVisibleParameterAnnotations, RuntimeInvisibleParameterAnnotations | method_info | 49.0 |
| AnnotationDefault | method_info | |
| MethodParameters | method_info | |
| Synthetic | ClassFile, field_info, method_info | |
| Deprecated | ClassFile, field_info, method_info | |
| Signature | ClassFile, field_info, method_info | |
| RuntimeVisibleAnnotations, RuntimeInvisibleAnnotations | ClassFile, field_info, method_info | |
| LineNumberTable | Code | |
| LocalVariableTable | Code | |
| LocalVariableTypeTable | Code | |
| StackMapTable | Code | |
| RuntimeVisibleTypeAnnotations, RuntimeInvisibleTypeAnnotations | ClassFile, field_info, method_info, Code |
ここで説明しない項目については下記を参照してください。
https://docs.oracle.com/javase/specs/jvms/se8/html/jvms-4.html#jvms-4.7
Code属性
Code_attribute {
    u2 attribute_name_index;
    u4 attribute_length;
    u2 max_stack;
    u2 max_locals;
    u4 code_length;
    u1 code[code_length];
    u2 exception_table_length;
    {   u2 start_pc;
        u2 end_pc;
        u2 handler_pc;
        u2 catch_type;
    } exception_table[exception_table_length];
    u2 attributes_count;
    attribute_info attributes[attributes_count];
}
attribute_name_indexとattribute_lengthは共通の形式で説明したものです。
attribute_name_indexで指定された文字は「Code」である必要があります。
max_stack項目の値は、 このメソッドのオペランドスタックの最大の深さになります。
max_locals項目の値は、このメソッドの呼出し時に割り当てられたローカル変数の数です。
code_length項目の値は、code[]の数となります。
code配列は、メソッドを実装するJava仮想マシン・コードの実際のバイトを示します。
このコードについては以下に説明があります。
https://docs.oracle.com/javase/specs/jvms/se8/html/jvms-6.html#jvms-6.5
exception_table_lengthはexception_tableのエントリ数を格納します。
exception_tableは例外情報を表します。
exception_tableの各項目の内容は以下のようになります。
・start_pc、end_pc:例外ハンドラが有効になっているcode配列のインデックス値を表します。javaのコードでいうとtry区で囲まれている範囲になります。
・handler_pcの項目は例外ハンドラの開始するcode配列のインデックス値です。javaのコードでいうとcatch区で囲まれている範囲になります。
・catch_typeは0または、constant_poolテーブルへの有効なインデックスであり、そのインデックスは例外クラスをあらわすCONSTANT_Class_info構造体です。
attributes_count、attributes[]はこのクラスファイルで定義されているクラスにつての属性情報を表すattribute構造体の配列になっています。
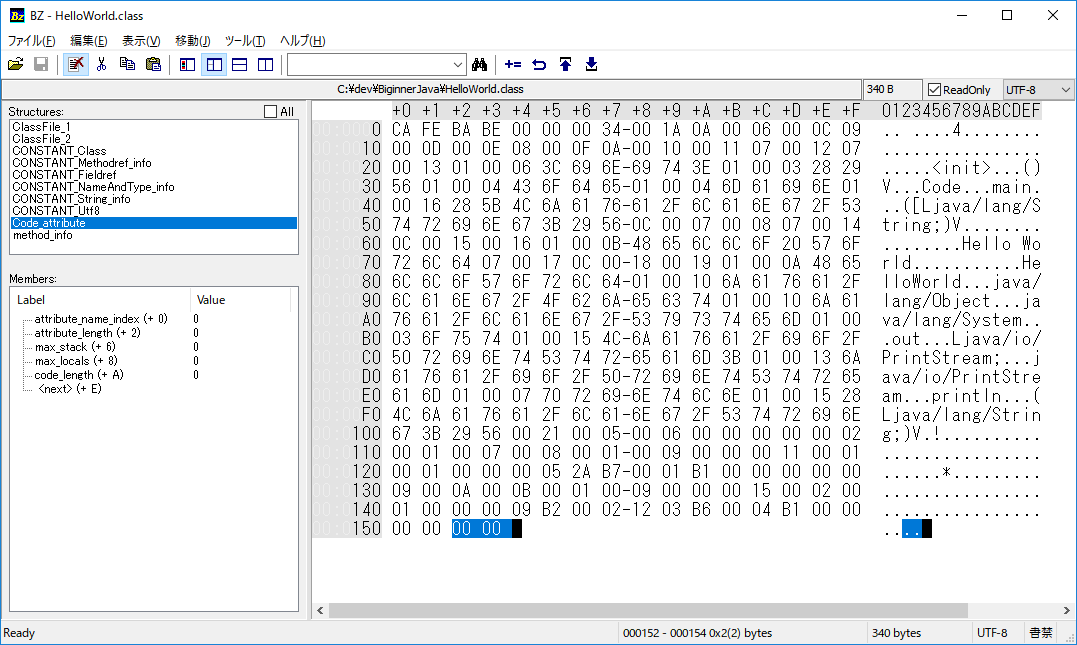
HelloWorld.classのバイナリ解析
バイナリエディタの選定と設定
マシン語兄貴は、どんなバイナリエディタを使用しても16進数を読み解くことができるでしょうが、正直、令和の時代になって16進数を読むには辛いので、なるべく楽に読めそうなバイナリエディタを検討してみました。
今回は、BZEditorを使用します。
BZEditorの採用理由は以下の通りです。
・Windowsで使える(最近はビルドすればMacOSでも使える模様)
・構造体表示ができる。
・日ノ本言葉が使える
・ソースが公開されているので、その気になれば拡張できる。
https://github.com/devil-tamachan/binaryeditorbz
その他のバイナリエディタを検討したい方はWikipediaにバイナリエディタの比較表を確認してみるといいでしょう。
https://en.wikipedia.org/wiki/Comparison_of_hex_editors
この中ではHxDが使いやすそうでした。
BZEditorの設定
構造体の定義
構造体の定義をBZEditorの実行ファイルと同じフォルダにあるBz.defで定義できます。
なお、固定サイズの構造体しか指定できませんので完璧に解析できません。
Bz.def
struct ClassFile_1 {
       BYTE magic[4];
       short minor_version;
       short majoir_version;
       short constant_pool_count;
} class;
struct ClassFile_2 {
       BYTE access_flags[2];
       short this_class;
       short super_class;
       short interfaces_count;
} class;

struct CONSTANT_Class {
       BYTE tag;
       short index;
} class;

struct CONSTANT_Methodref_info {
       BYTE tag;
       short class_index;
       short name_and_type_index;
} class;

struct CONSTANT_Fieldref {
       BYTE tag;
       short class_index;
       short name_and_type_index;
} class;

struct CONSTANT_NameAndType_info {
       BYTE tag;
       short name_index;
       short descriptor_index;
} class;

struct CONSTANT_String_info {
       BYTE tag;
       short string_index;
} class;

struct CONSTANT_Utf8 {
       BYTE tag;
       short length;
} class;

struct Code_attribute {
       short attribute_name_index;
       int attribute_length;
       short max_stack;
       short max_locals;
       int code_length;
} class;
このBZ.defはC言語ライクに記載できます。
使用できる型としては以下のコードのTYPESTR[NUM_MEMBERS] を参照してください。
https://github.com/devil-tamachan/binaryeditorbz/blob/master/Bz/BZFormVw.cpp
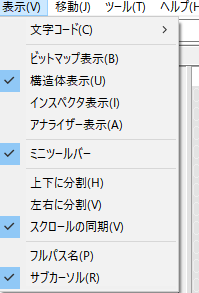
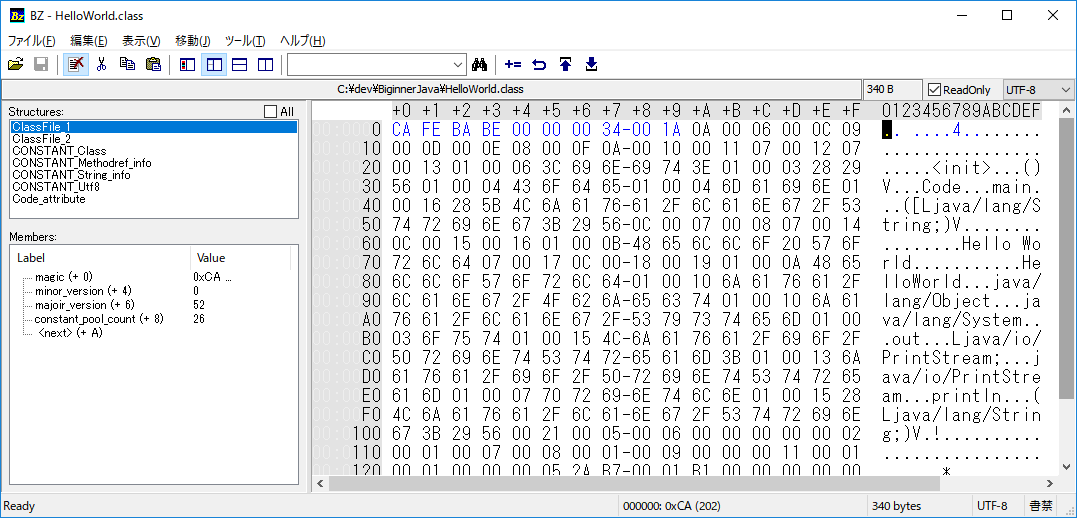
BZEditor起動後、「表示」>「構造体表示」をチェックすることで構造体表示用の子ウィンドウが表示されます。
アドレスをダブルクリックすることで、そのアドレスを始点とした構造体情報を表示します。
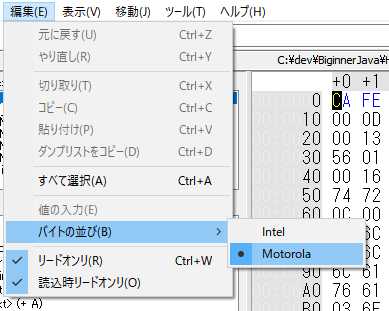
バイトの並びの変更
classファイルを解析するときはMotorolaを選択します。
BZEditorによるclassファイルの解析
では先頭からClassFileの解析をしていきます。
先頭~constant_pool_countまで
magicは「0xCAFEBABE」が表示されています。
minor versionは0
major_versionは52です。
constant_pool_countは26になり、次のバイトからconstant_poolのエントリになります。
constant_pool[]の解析
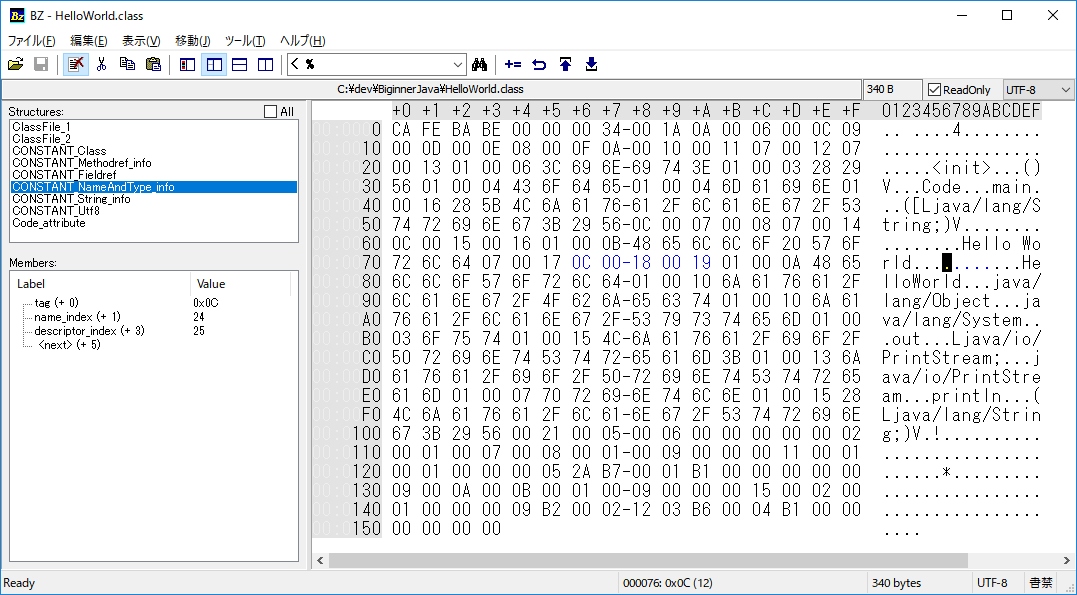
constant_pool[1]
1バイト目が0x0A=10なので、このconstant_poolのエントリはCONSTANT_Methodrefになります。
class_indexは6、name_and_type_indexは12です。
これらのインデックスが実際になにを指示しているかはconstant_poolを全て見終わった後に確認します。
constant_pool[2]

1バイト目が0x09なので、このconstant_poolのエントリはCONSTANT_Fieldrefになります。
class_indexは13、name_and_type_indexは14です。
constant_pool[3]
1バイト目が0x08なので、のconstant_poolのエントリはCONSTANT_Stringになります。
indexは15となります。
constant_pool[4]
1バイト目が0x0A=10なので、このconstant_poolのエントリはCONSTANT_Methodrefになります。
class_indexは16、name_and_type_indexは17です。
constant_pool[5]
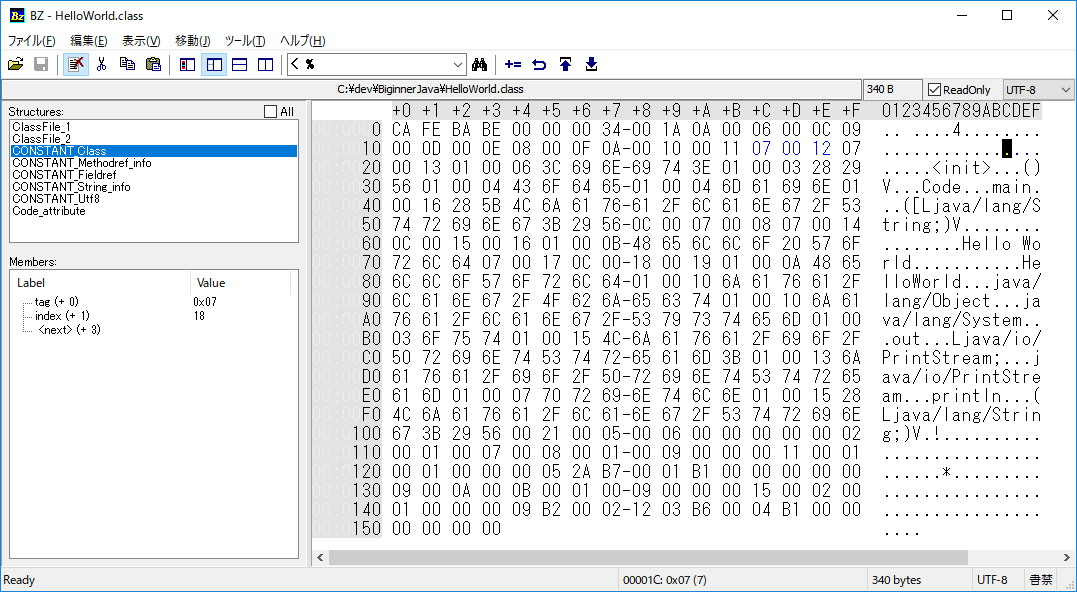
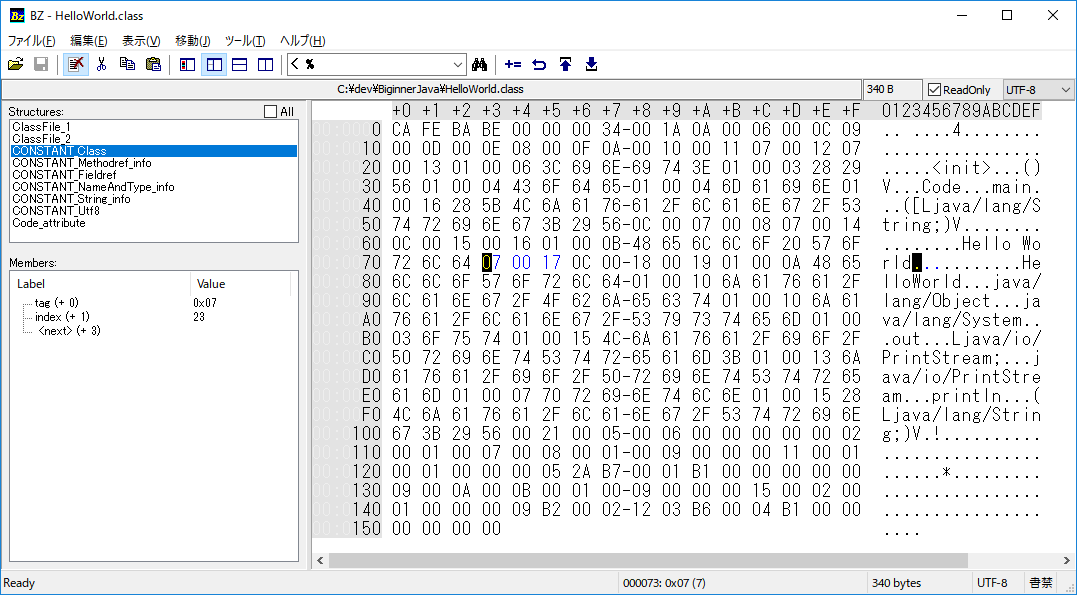
1バイト目が0x07なので、このconstant_poolのエントリはCONSTANT_Classになります。
indexは18になります。
constant_pool[6]
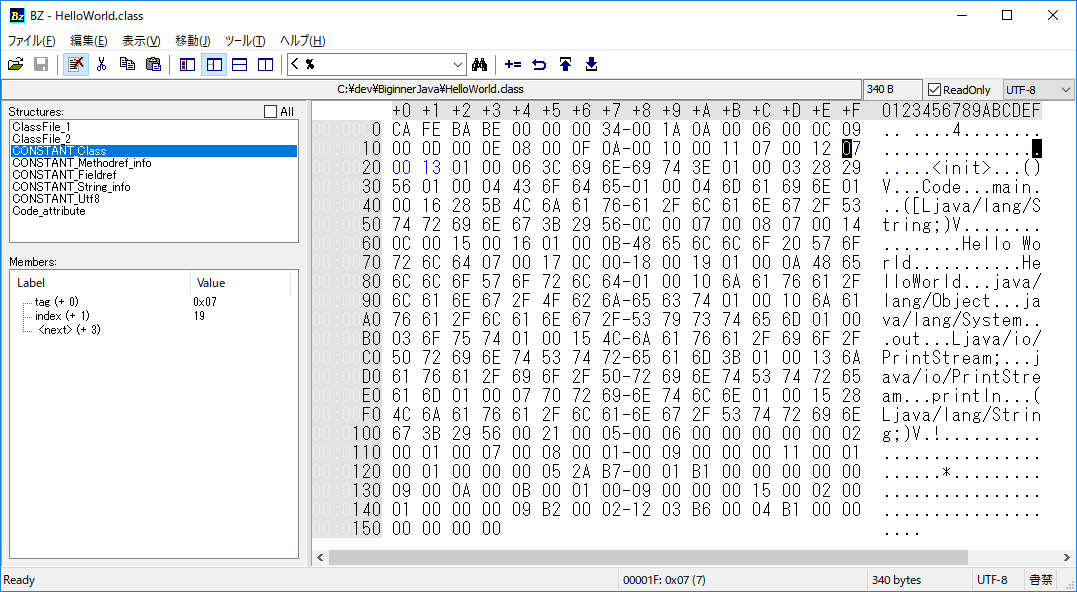
1バイト目が0x07なので、このconstant_poolのエントリはCONSTANT_Classになります。
indexは19になります。
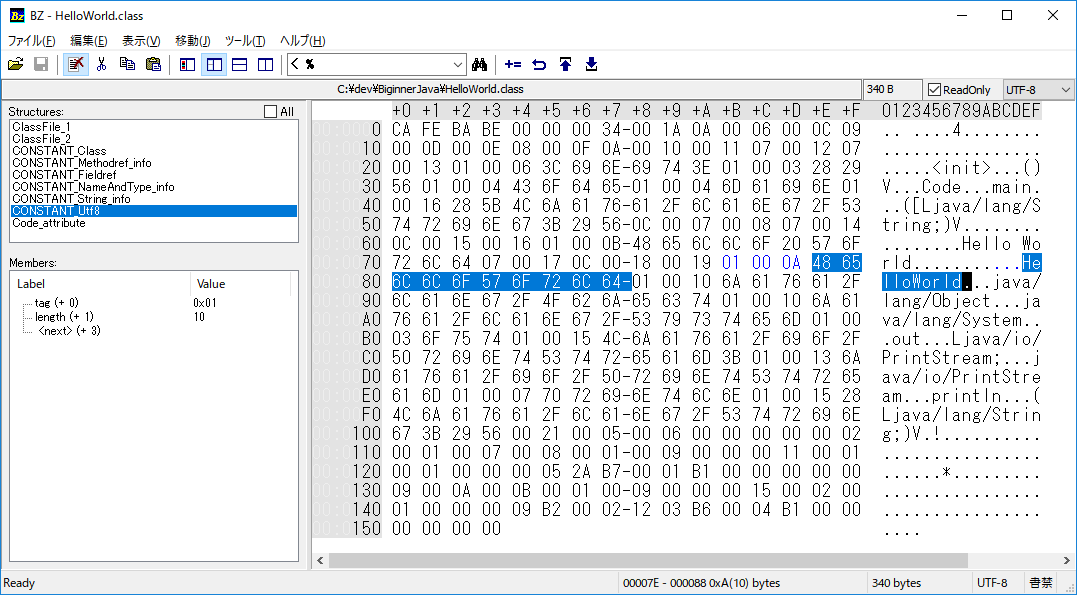
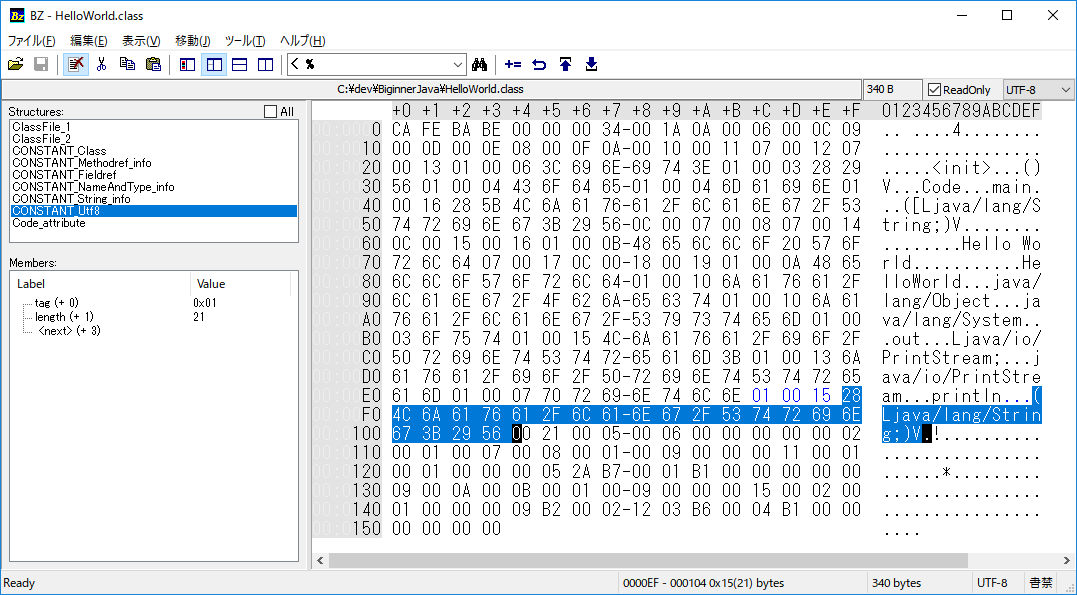
constant_pool[7]
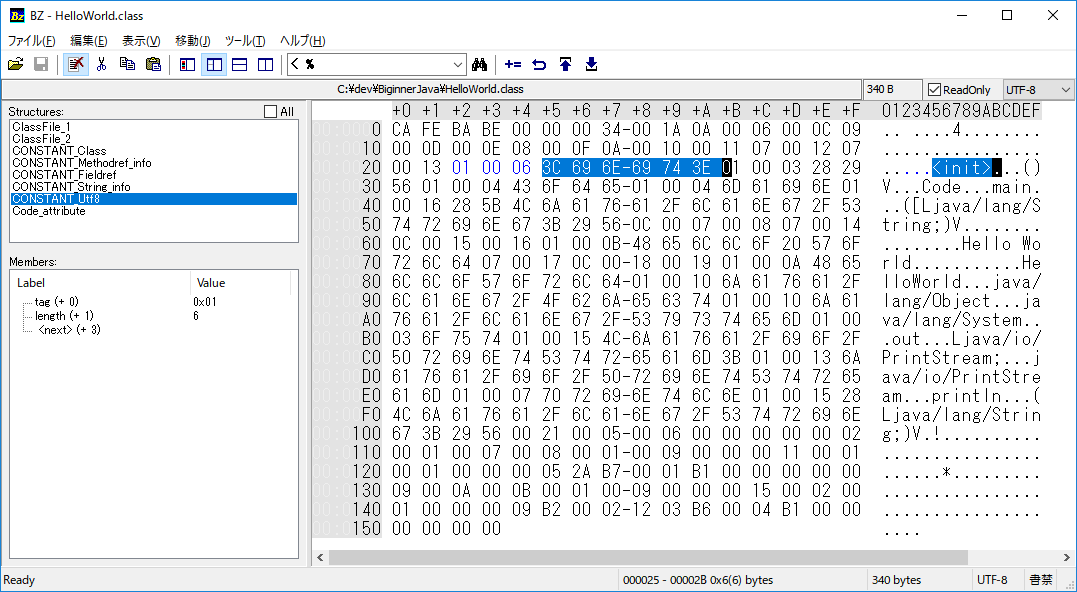
1バイト目が0x01なので、このconstant_poolのエントリはCONSTANT_Utf8になります。
lengthは6となり、そのあとの6バイトで「\<init>」という文字を格納しています。
constant_pool[8]
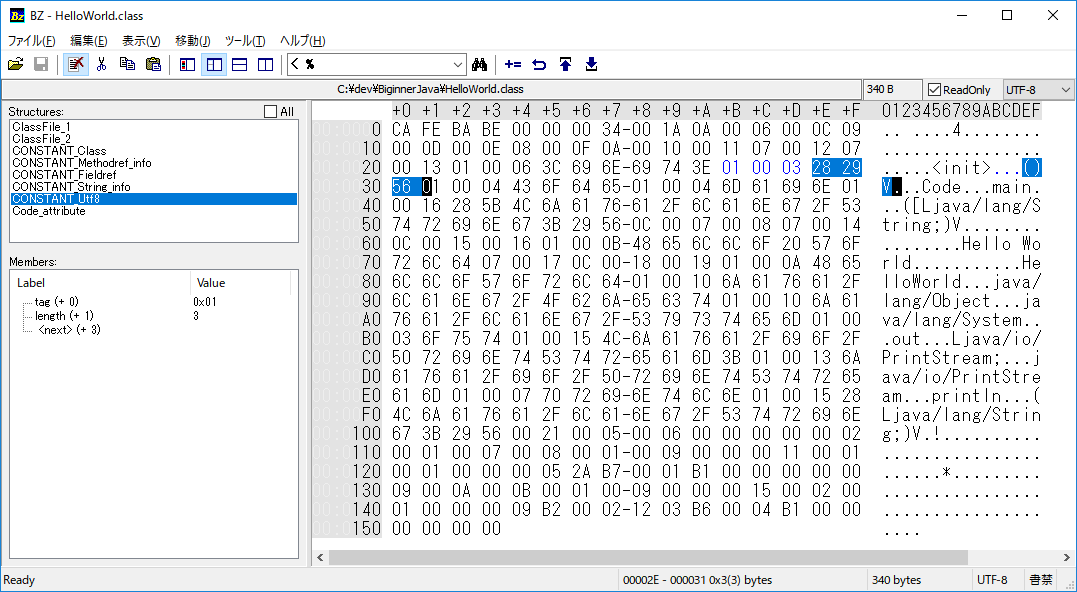
1バイト目が0x01なので、このconstant_poolのエントリはCONSTANT_Utf8になります。
lengthは3となり、そのあとの3バイトで「()V」という文字を格納しています。
constant_pool[9]
1バイト目が0x01なので、このconstant_poolのエントリはCONSTANT_Utf8になります。
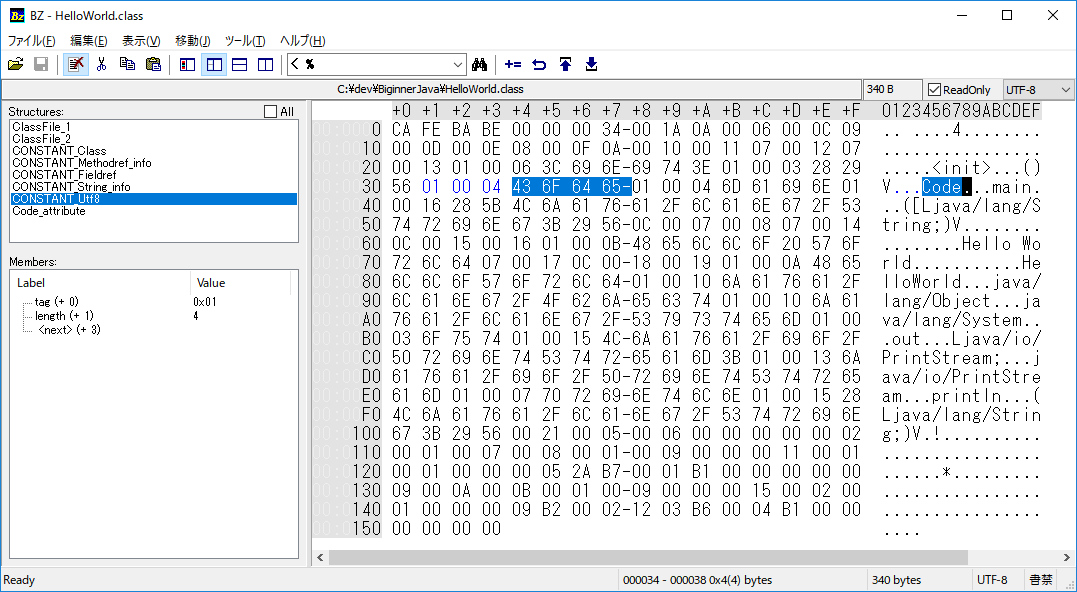
lengthは4となり、そのあとの4バイトで「Code」という文字を格納しています。
constant_pool[10]
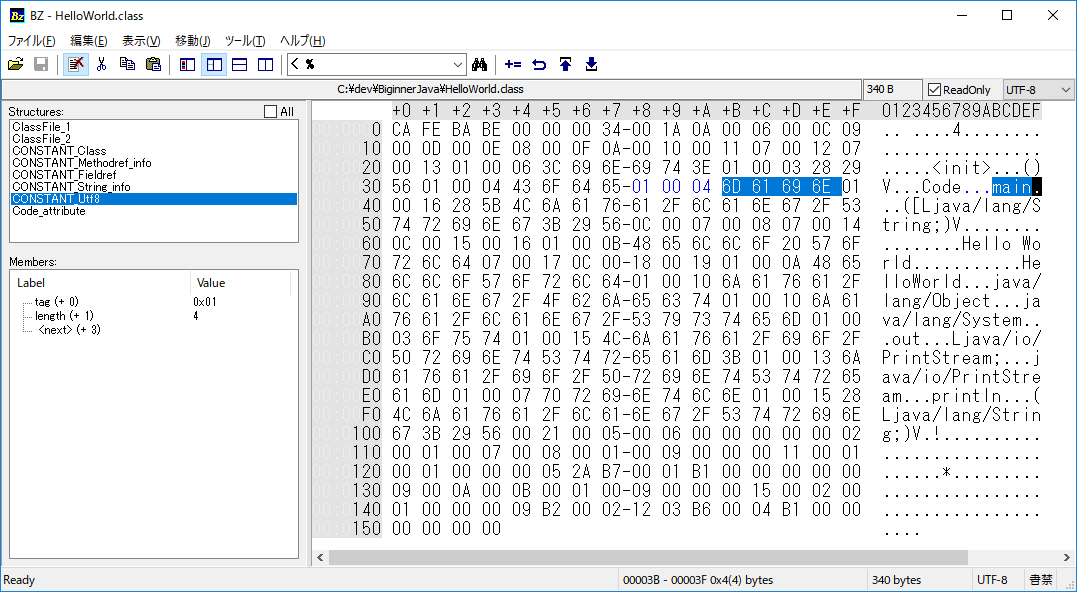
1バイト目が0x01なので、このconstant_poolのエントリはCONSTANT_Utf8になります。
lengthは4となり、そのあとの4バイトで「main」という文字を格納しています。
constant_pool[11]

1バイト目が0x01なので、このconstant_poolのエントリはCONSTANT_Utf8になります。
lengthは22となり、そのあとの22バイトで「([Ljava/lang/String;)V」という文字を格納しています。
constant_pool[12]
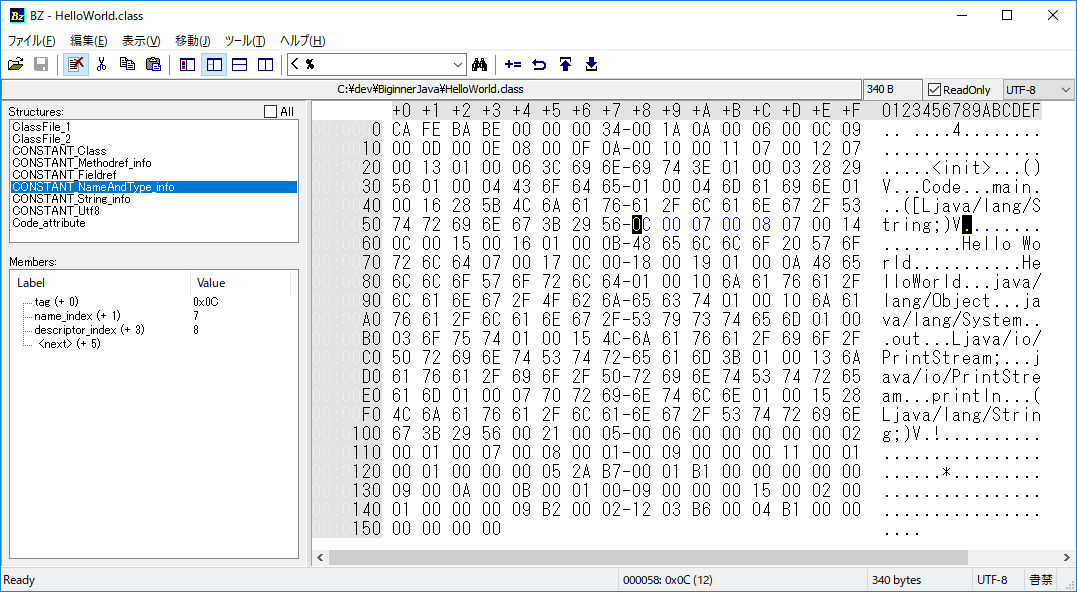
1バイトめが0x0C=12なので、このconstant_poolのエントリはCONSTANT_NameAndType_info構造体になります。
name_indexは7,descriptor_indexは8になります。
constant_pool[13]

1バイト目が0x07なので、このconstant_poolのエントリはCONSTANT_Classになります。
indexは20になります。
constant_pool[14]

1バイトめが0x0C=12なので、このconstant_poolのエントリはCONSTANT_NameAndType_info構造体になります。
name_indexは21,descriptor_indexは22になります。
constant_pool[15]

1バイト目が0x01なので、このconstant_poolのエントリはCONSTANT_Utf8になります。
lengthは11となり、そのあとの11バイトで「Hello World」という文字を格納しています。
constant_pool[16]
1バイト目が0x07なので、このconstant_poolのエントリはCONSTANT_Classになります。
indexは23になります。
constant_pool[17]
1バイトめが0x0C=12なので、このconstant_poolのエントリはCONSTANT_NameAndType_info構造体になります。
name_indexは24,descriptor_indexは25になります。
constant_pool[18]
1バイト目が0x01なので、このconstant_poolのエントリはCONSTANT_Utf8になります。
lengthは10となり、そのあとの10バイトで「HelloWorld」という文字を格納しています。
constant_pool[19]
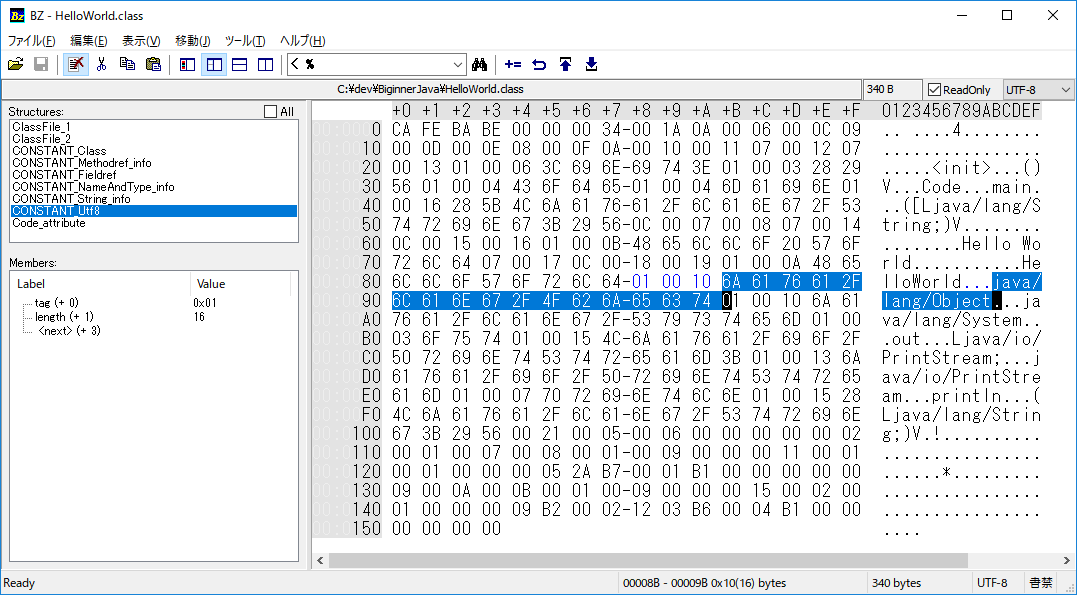
1バイト目が0x01なので、このconstant_poolのエントリはCONSTANT_Utf8になります。
lengthは16となり、そのあとの16バイトで「java/lang/Object」という文字を格納しています。
constant_pool[20]
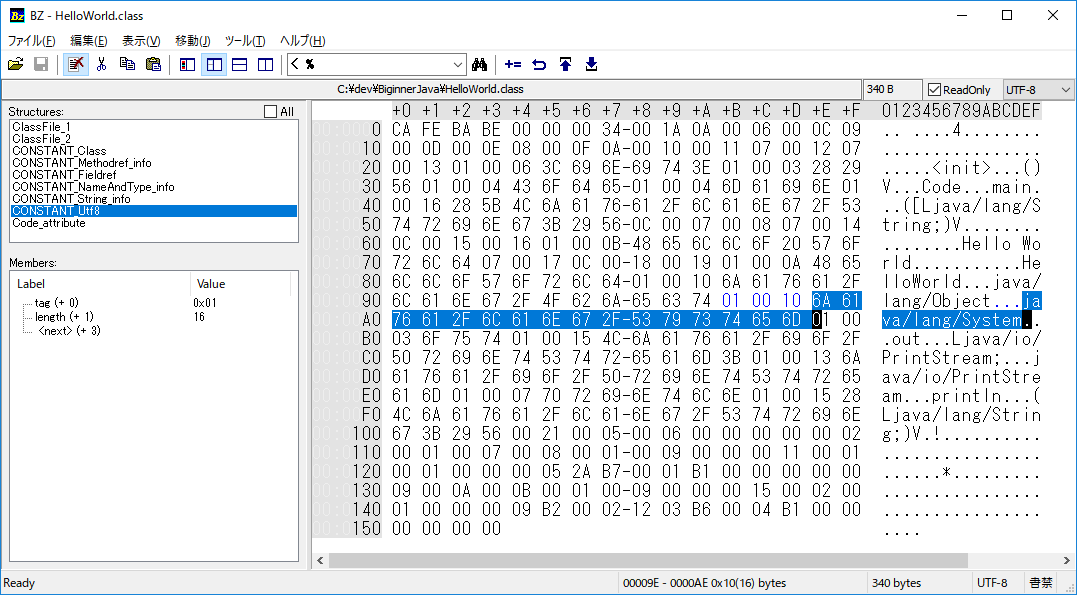
1バイト目が0x01なので、このconstant_poolのエントリはCONSTANT_Utf8になります。
lengthは16となり、そのあとの16バイトで「java/lang/System」という文字を格納しています。
constant_pool[21]
1バイト目が0x01なので、このconstant_poolのエントリはCONSTANT_Utf8になります。
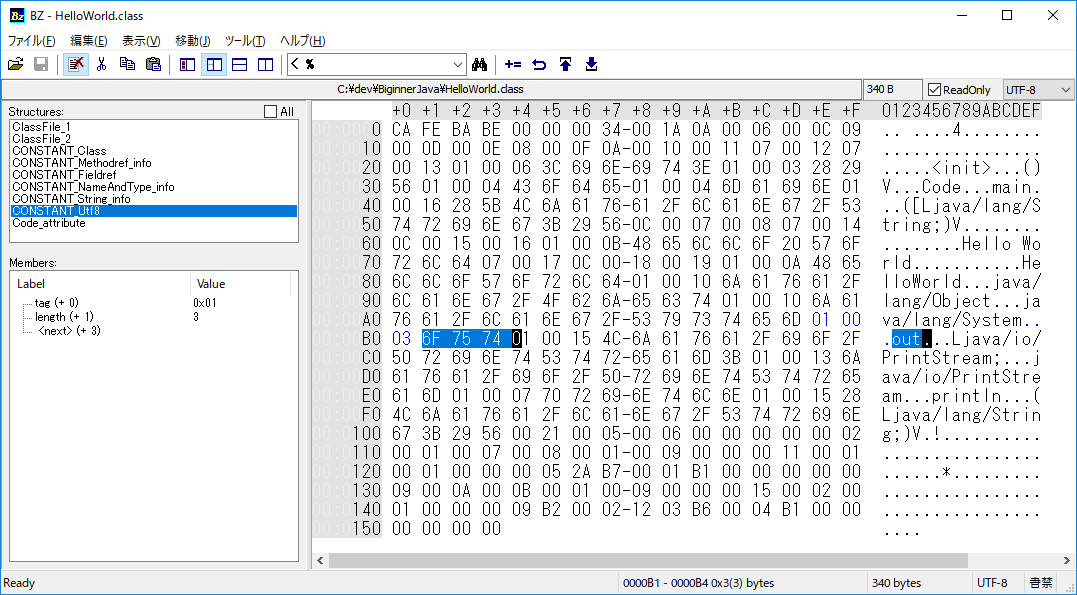
lengthは3となり、そのあとの3バイトで「out」という文字を格納しています。
constant_pool[22]
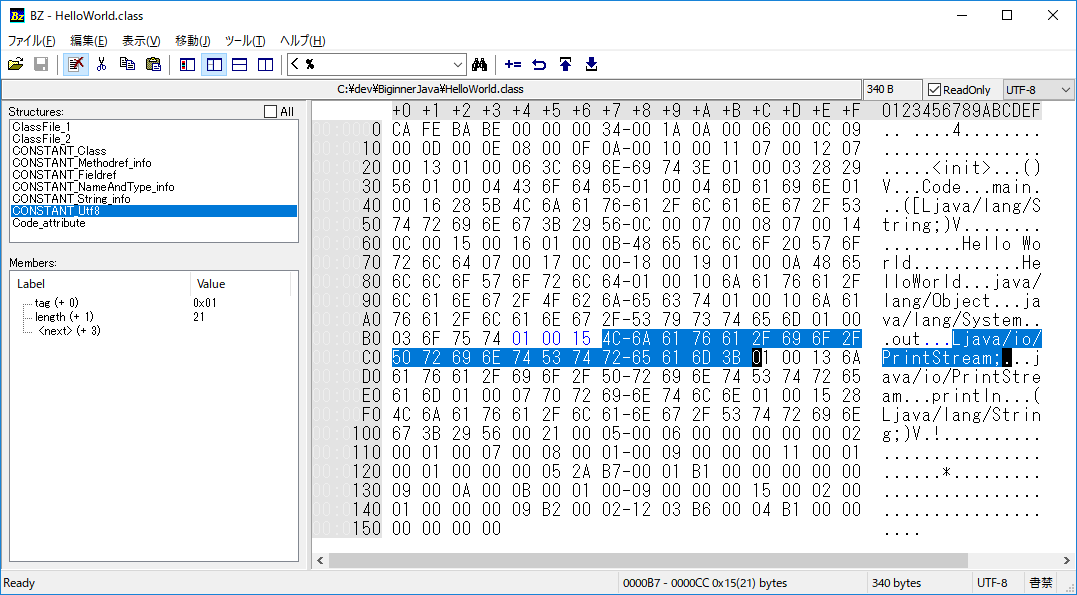
1バイト目が0x01なので、このconstant_poolのエントリはCONSTANT_Utf8になります。
lengthは21となり、そのあとの21バイトで「Ljava/io/PrintStream;」という文字を格納しています。
constant_pool[23]
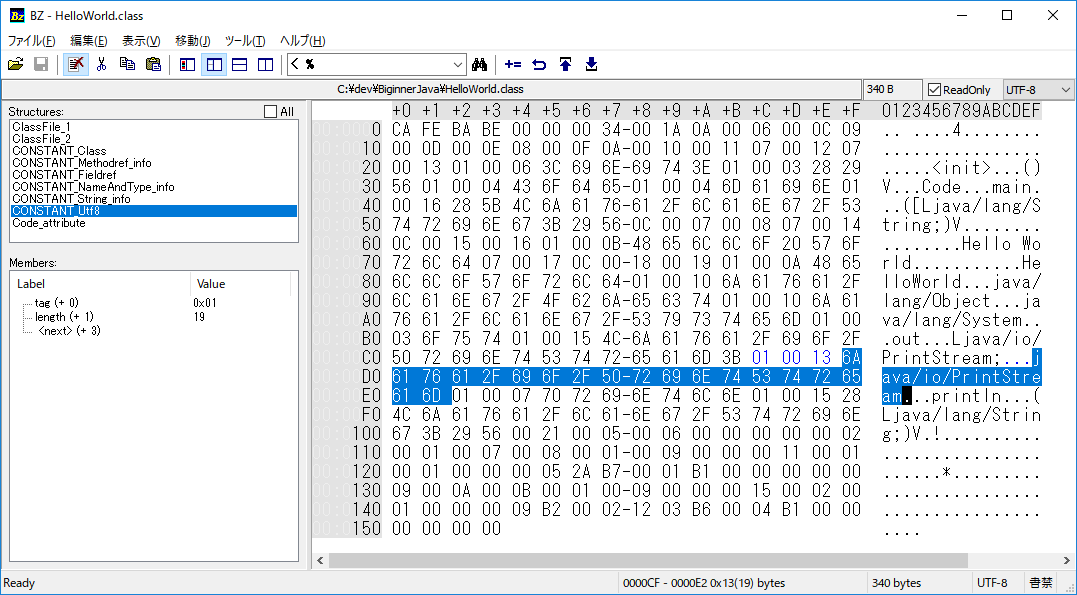
1バイト目が0x01なので、このconstant_poolのエントリはCONSTANT_Utf8になります。
lengthは19となり、そのあとの19バイトで「java/io/PrintStream」という文字を格納しています。
constant_pool[24]
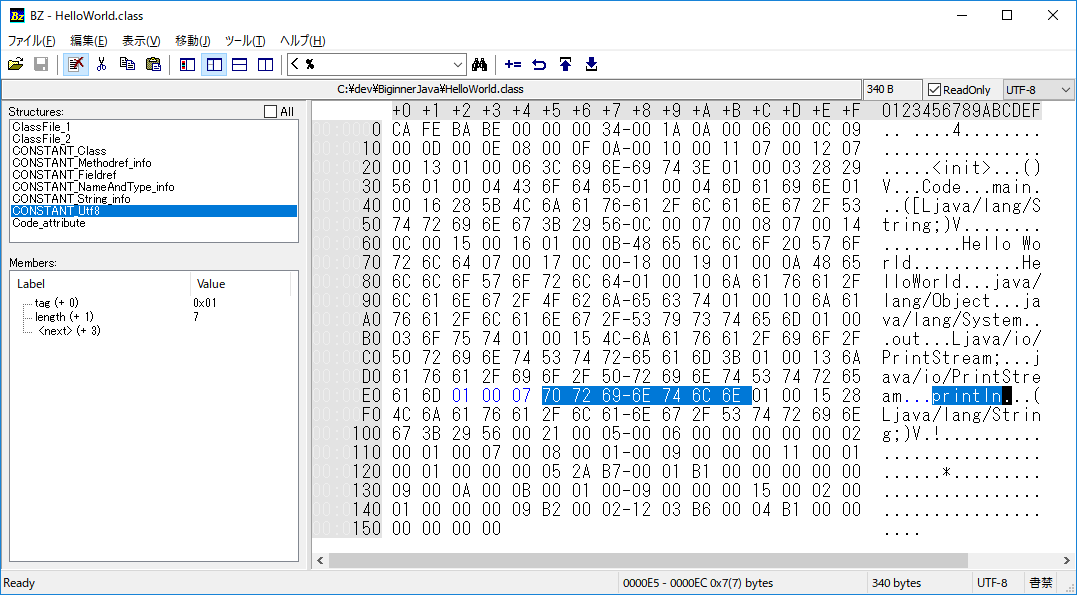
1バイト目が0x01なので、このconstant_poolのエントリはCONSTANT_Utf8になります。
lengthは7となり、そのあとの7バイトで「println」という文字を格納しています。
constant_pool[25]
1バイト目が0x01なので、このconstant_poolのエントリはCONSTANT_Utf8になります。
lengthは21となり、そのあとの21バイトで「(Ljava/lang/String;)V」という文字を格納しています。
HelloWorld.classのconstant_poolのまとめ
constant_poolをまとめると以下のようになります。
| No | 構造体 | 内容 |
|---|---|---|
| 1 | CONSTANT_Methodref | class_indexは6:HelloWorld、name_and_type_indexは12: |
| 2 | CONSTANT_Fieldref | class_indexは13:java/lang/System、name_and_type_indexは14: out:Ljava/io/PrintStream; |
| 3 | CONSTANT_String | indexは15:「Hello World」 |
| 4 | CONSTANT_Methodref | class_indexは16:java/io/PrintStream、name_and_type_indexは17:println:(Ljava/lang/String;)V |
| 5 | CONSTANT_Class | indexは18:「HelloWorld」 |
| 6 | CONSTANT_Class | indexは19:「java/lang/Object」 |
| 7 | CONSTANT_Utf8 | 「\<init>」という文字列です |
| 8 | CONSTANT_Utf8 | 「()V」という文字列です |
| 9 | CONSTANT_Utf8 | 「Code」という文字列です |
| 10 | CONSTANT_Utf8 | 「main」という文字列です |
| 11 | CONSTANT_Utf8 | 「([Ljava/lang/String;)V」という文字列です |
| 12 | CONSTANT_NameAndType_info | name_indexは7:「\<init>」,descriptor_indexは8:「()V」。Method Descriptorsを参照 |
| 13 | CONSTANT_Class | indexは20;「java/lang/System」 |
| 14 | CONSTANT_NameAndType_info | name_indexは21:「out」,descriptor_indexは22:「Ljava/io/PrintStream;」Field Descriptorsを参照 |
| 15 | CONSTANT_Utf8 | 「Hello World」という文字列です |
| 16 | CONSTANT_Class | indexは23:「java/io/PrintStream」 |
| 17 | CONSTANT_NameAndType_info | name_indexは24:「println」,descriptor_indexは25:「(Ljava/lang/String;)V」Method Descriptorsを参照 |
| 18 | CONSTANT_Utf8 | 「HelloWorld」という文字列です |
| 19 | CONSTANT_Utf8 | 「java/lang/Object」という文字列です |
| 20 | CONSTANT_Utf8 | 「java/lang/System」という文字列です |
| 21 | CONSTANT_Utf8 | 「out」という文字列です |
| 22 | CONSTANT_Utf8 | 「Ljava/io/PrintStream;」という文字列です |
| 23 | CONSTANT_Utf8 | 「java/io/PrintStream」という文字列です |
| 24 | CONSTANT_Utf8 | 「println」という文字列です |
| 25 | CONSTANT_Utf8 | 「(Ljava/lang/String;)V」という文字列です |
access_flags~interfaces[]まで
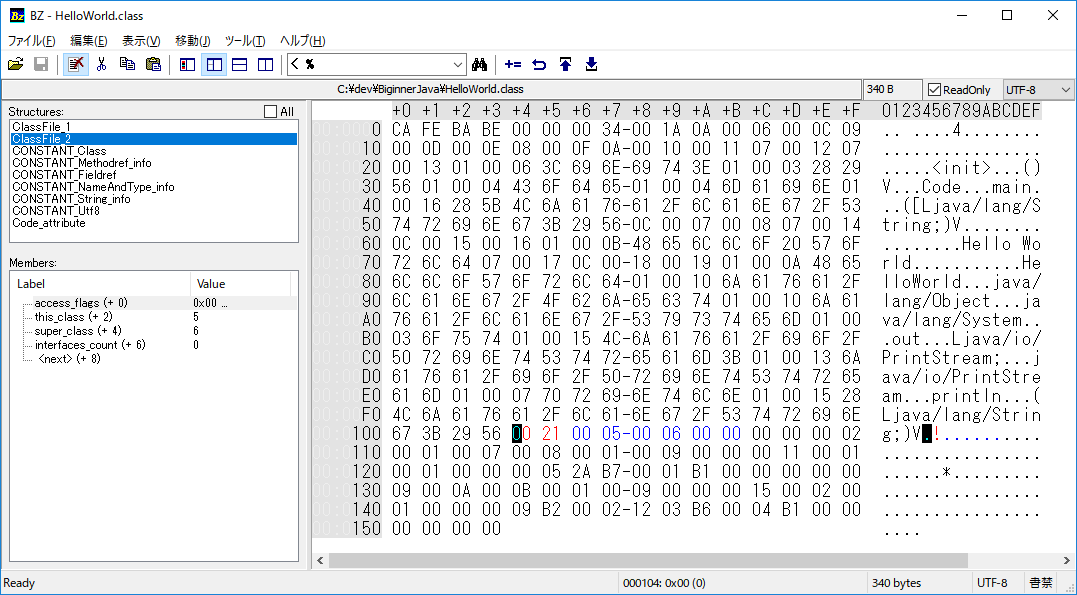
・access_flagsは0x0021。つまりACC_SUPER(0x20) と ACC_PUBLIC(0x01)となります。
・this_classはconstant_pool[5]なのでHelloWorldクラスです。
・super_classはconstant_pool[6]なのでjava/lang/Objectクラスです。
・interfaces_countは0で、次に続くinterfaces[]は存在しません。
fields_count~fileds[]まで
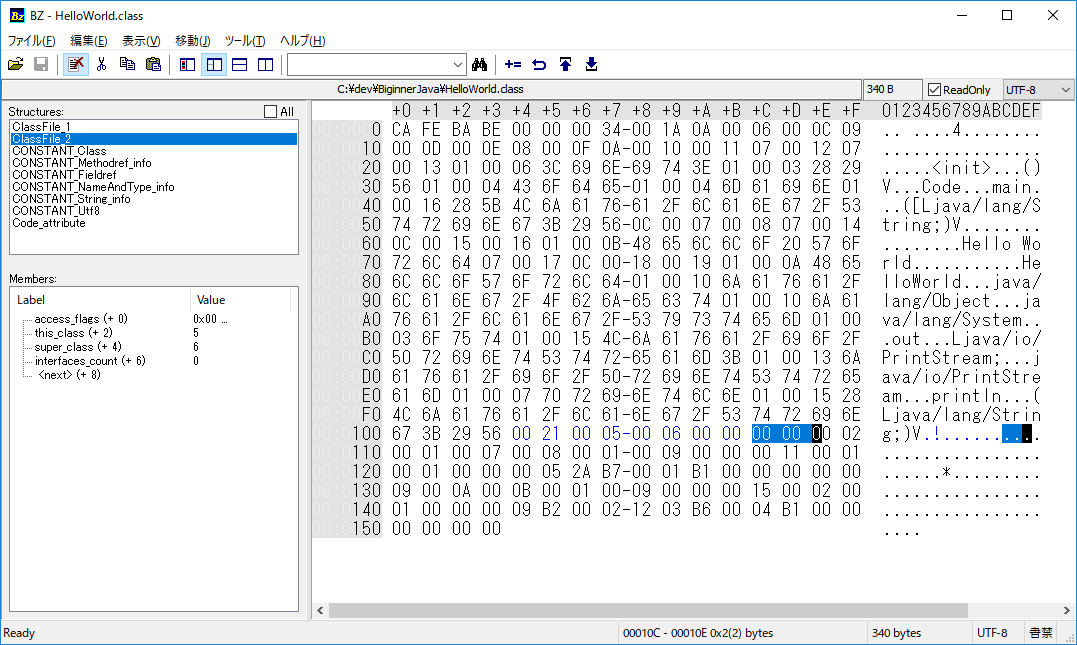
fields_countが0のため、次に続くfiledsは存在しません。
methods_count~methods[]
methods_countは0x0002のため2件、method_info構造体が続きます。
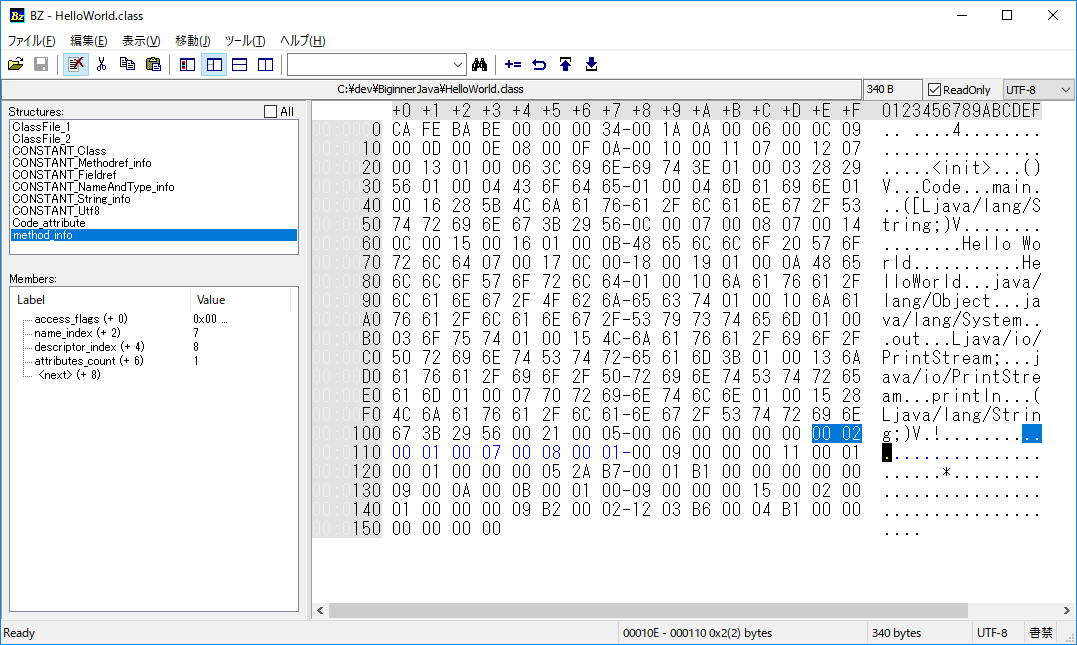
method_info[0]
・access_flagsは0x0001。つまりACC_PUBLIC(0x01)となります。
・name_indexはconstant_pool[7]の「\<init>」となります。
これはJavaコンパイル時に作成された暗黙のコンストラクタになります。
・description_indexはconstant_pool[8]の「()V」となります。
・attributes_countは1となり、attributes構造体が1つ存在します。
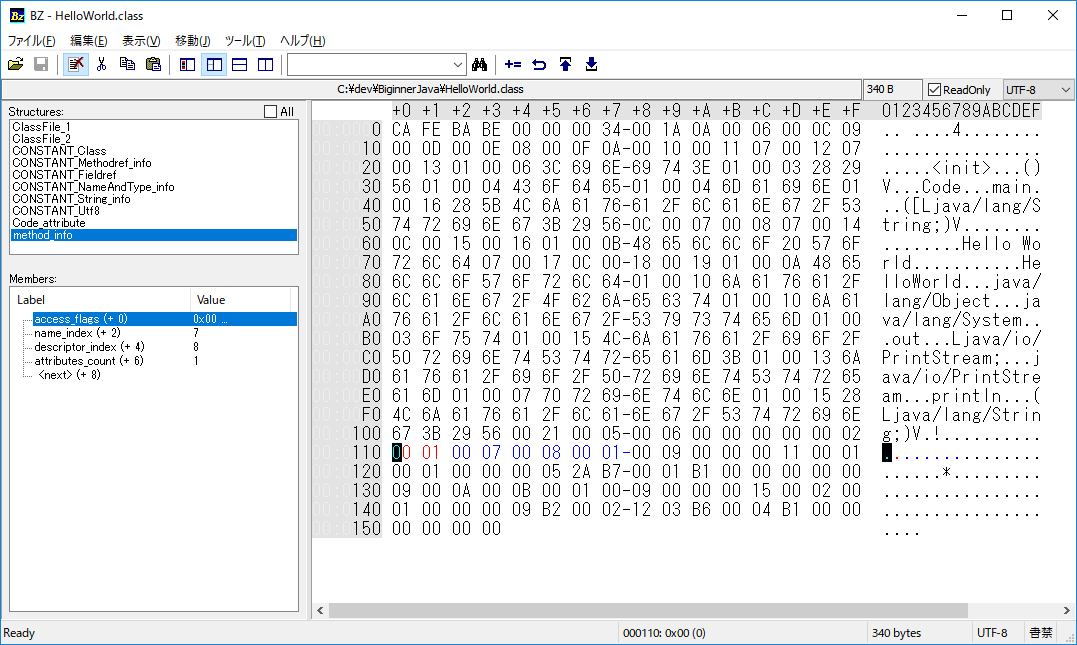
method_info[0].attributes[0]
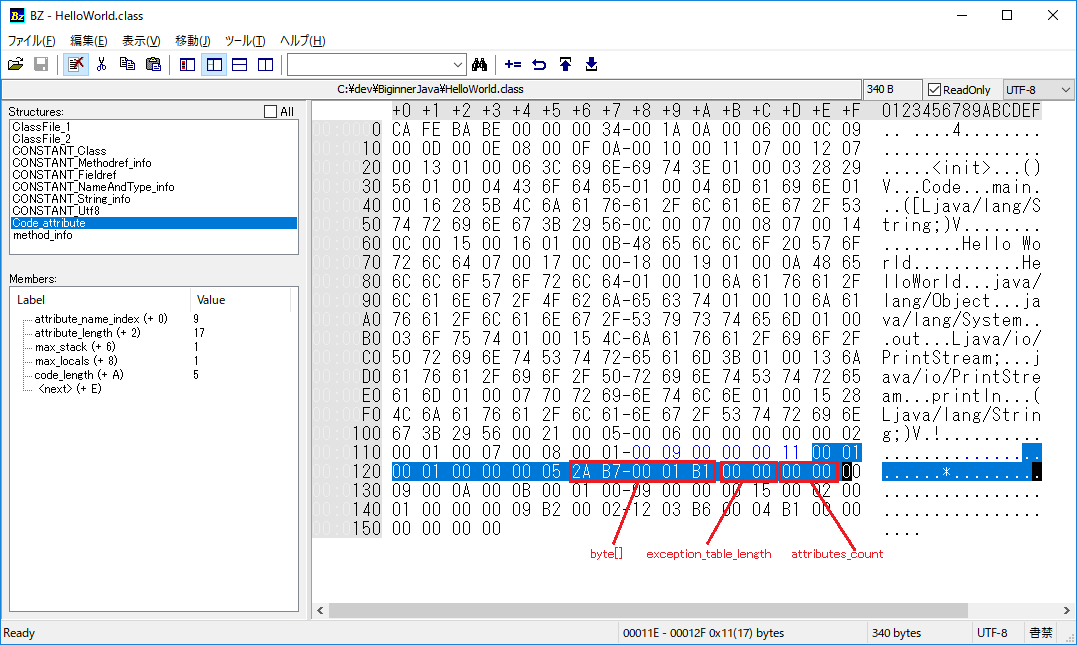
attribute_name_indexはconstant_pool[9]の「Code」になるため、この構造体はCode_attribute構造体になります。
attribute_lengthは17バイトとなり、この構造体のサイズを決定します。
max_stackは1, max_localsは1となります。
code_lengthは5となり次の「0x 2A B7 00 01 B1」がバイトコードであることを表します。
0x2aはaload_0になります。この命令はthisをオペランドスタックにつみます。
0xb7はinvokesplecialになります。
この命令は後続の2バイトをconstant_poolのインデックスとしてメソッドを呼び出します。
今回の場合「0x00 01」なのでconstant_pool[1]である、「java/lang/Object."
0xb1はreturnになります。
exception_table_length, attributes_countはともに0になります。
method_info[1]
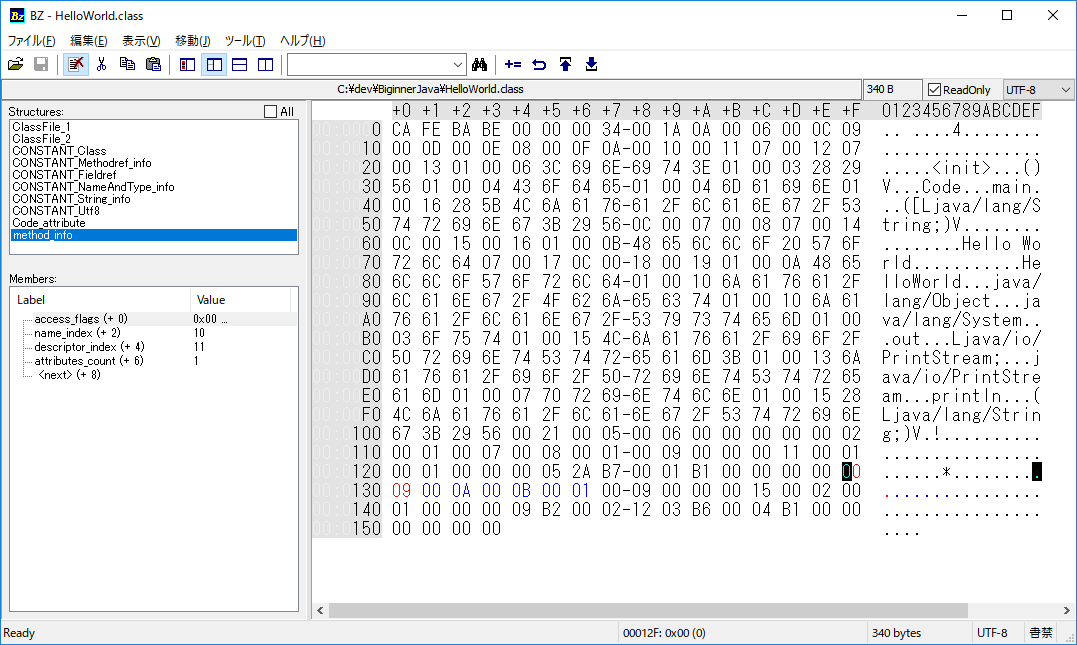
・access_flagsは0x0009。つまりACC_PUBLIC(0x01)とACC_STATIC(0x08)となります。
・name_indexはconstant_pool[10]の「main」となります。
・description_indexはconstant_pool[11]の「([Ljava/lang/String;)V」」となります。
・attributes_countは1となり、attributes構造体が1つ存在します。
method_info[1].attributes[0]
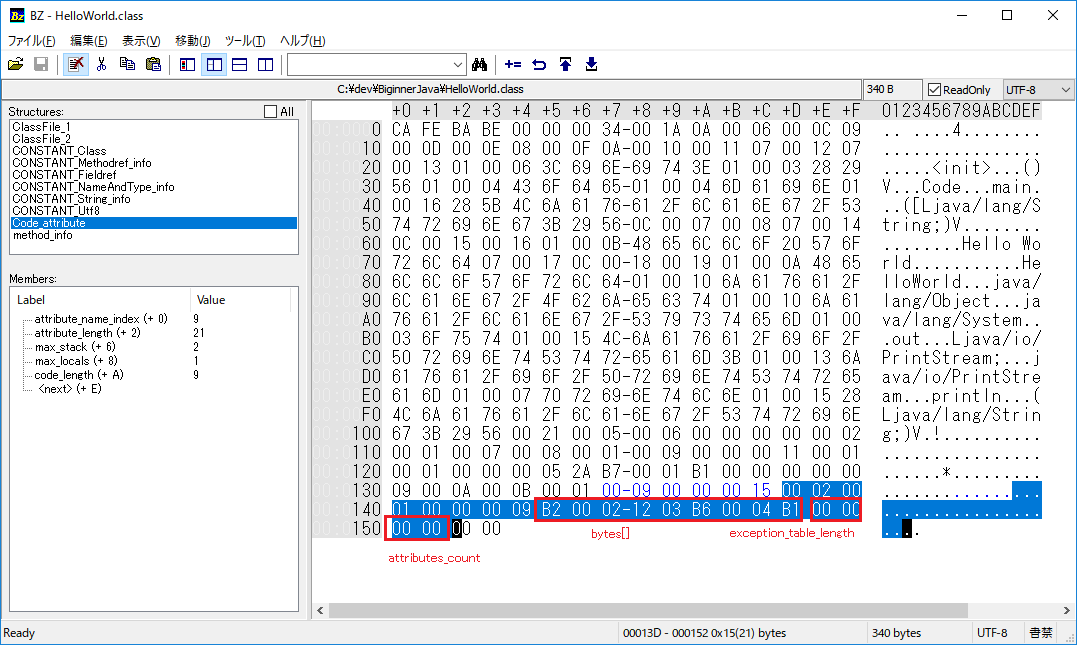
attribute_name_indexはconstant_pool[9]の「Code」になるため、この構造体はCode_attribute構造体になります。
attribute_lengthは21バイトとなり、この構造体のサイズを決定します。
max_stackは2, max_localsは1となります。
code_lengthは9となり次の「0x B2 00 02 12 03 B6 00 04 B1」がバイトコードであることを表します。
0xb2はgetstaticです。
この命令は後続の2バイトをconstant_poolのインデックスとしてstaticクラスからフィールドを取得します。
今回の場合「0x00 02」なのでconstant_pool[2]である、「java/lang/System」クラスの「 out:Ljava/io/PrintStream」を取得します。
取得した結果はオペランドスタックに積みます。
0x12はldcです。
この命令は後続の1バイトをconstant_poolのインデックスとして使用して、その内容をオペランドスタックに積みます。
今回の場合は「0x03」なのでconstant_pool[3]の「Hello World」という文字列をオペランドスタックに積みます。
0xb6はinvokevirtualです。
この命令は後続の2バイトをconstant_poolのインデックスとして使用して、そのメソッドを実行します。
今回の場合は「0x00 04」なのでconstant_pool[4]である、java/io/PrintStreamクラスのprintln:(Ljava/lang/String;)Vを実行します。
0xb1はreturnになります。
exception_table_length, attributes_countはともに0になります。
ClassFile のattributes_count、attributes[]
attributes_countが0なのでattributesのデータは存在しません。
クラスファイルの解析のまとめ
このようにJVMの仕様書とバイナリエディタでクラスファイルの解析が行えます。
ただし、こんな面倒なバイナリエディタを使用しなくてもjavapコマンドで解析できます。
>javap -v HelloWorld
Classfile /C:/XXXXXXX/HelloWorld.class
  Last modified 2019/06/09; size 340 bytes
  MD5 checksum 3ee6d0a4b44197baaeb0cec79a0b73d3
public class HelloWorld
  minor version: 0
  major version: 52
  flags: ACC_PUBLIC, ACC_SUPER
Constant pool:
   #1 = Methodref          #6.#12         // java/lang/Object."<init>":()V
   #2 = Fieldref           #13.#14        // java/lang/System.out:Ljava/io/PrintStream;
   #3 = String             #15            // Hello World
   #4 = Methodref          #16.#17        // java/io/PrintStream.println:(Ljava/lang/String;)V
   #5 = Class              #18            // HelloWorld
   #6 = Class              #19            // java/lang/Object
   #7 = Utf8               <init>
   #8 = Utf8               ()V
   #9 = Utf8               Code
  #10 = Utf8               main
  #11 = Utf8               ([Ljava/lang/String;)V
  #12 = NameAndType        #7:#8          // "<init>":()V
  #13 = Class              #20            // java/lang/System
  #14 = NameAndType        #21:#22        // out:Ljava/io/PrintStream;
  #15 = Utf8               Hello World
  #16 = Class              #23            // java/io/PrintStream
  #17 = NameAndType        #24:#25        // println:(Ljava/lang/String;)V
  #18 = Utf8               HelloWorld
  #19 = Utf8               java/lang/Object
  #20 = Utf8               java/lang/System
  #21 = Utf8               out
  #22 = Utf8               Ljava/io/PrintStream;
  #23 = Utf8               java/io/PrintStream
  #24 = Utf8               println
  #25 = Utf8               (Ljava/lang/String;)V
{
  public HelloWorld();
    descriptor: ()V
    flags: ACC_PUBLIC
    Code:
      stack=1, locals=1, args_size=1
         0: aload_0
         1: invokespecial #1                  // Method java/lang/Object."<init>":()V
         4: return

  public static void main(java.lang.String[]);
    descriptor: ([Ljava/lang/String;)V
    flags: ACC_PUBLIC, ACC_STATIC
    Code:
      stack=2, locals=1, args_size=1
         0: getstatic     #2                  // Field java/lang/System.out:Ljava/io/PrintStream;
         3: ldc           #3                  // String Hello World
         5: invokevirtual #4                  // Method java/io/PrintStream.println:(Ljava/lang/String;)V
         8: return
}
バイナリを読むより全然らくですね。
いやぁ、これでHelloWorldの理解が深まりました。めでたしめでたし。
(調査を)まだやるかい
もうちょっとこのHelloWorld.classがどう動くか掘り下げてみようと思います。
インタラプタとコンパイラ
よくJavaは複数回コンパイルされる場合があるといわれますが、どういうことでしょうか。
これについてはTobias Hartmann氏が記述したThe Java HotSpot VMに記載があります。
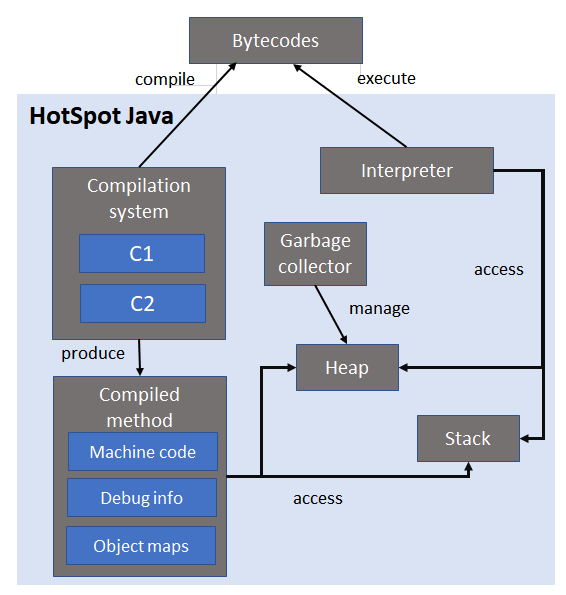
上記の図のように作成されたバイトコードはC1またはC2でコンパイルされたマシンコードで実行されるか、インタプリタで実行されるかのいずれかになります。
また、Java8ではインタプリタで動作していたものが途中からC1でコンパイルしたものに変わったり、インタプリタ→C1→C2と段階的にコンパイルしていく場合があります。
つまり、私はHelloWorldがどう動いたなんて全然わかっちゃいなかったんだ・・・
コンパイルされたのかどうか
実行されたバイトコードがインタプリタで実行されたのか、それともコンパイルされたマシンコードで実行されたかを確認する方法はあるのでしょうか?
javaを実行時に「-XX:+PrintCompilation」を使用することで、それは判明します。
>java  -XX:+PrintCompilation HelloWorld
     73    1       3       java.lang.String::hashCode (55 bytes)
     74    2       3       java.lang.String::equals (81 bytes)
     75    4     n 0       java.lang.System::arraycopy (native)   (static)
     76    3       4       java.lang.String::charAt (29 bytes)
     76    5       3       java.lang.Object::<init> (1 bytes)
     78    6       4       sun.misc.ASCIICaseInsensitiveComparator::toLower (16 bytes)
     78    7       4       sun.misc.ASCIICaseInsensitiveComparator::isUpper (18 bytes)
     79    8       4       java.lang.String::length (6 bytes)
     79    9       3       java.lang.AbstractStringBuilder::ensureCapacityInternal (27 bytes)
     80   10       3       java.lang.Character::toLowerCase (9 bytes)
     80   11       3       java.lang.CharacterData::of (120 bytes)
     81   15       1       java.lang.Object::<init> (1 bytes)
     81    5       3       java.lang.Object::<init> (1 bytes)   made not entrant
     81   12       3       java.lang.CharacterDataLatin1::toLowerCase (39 bytes)
     82   13       3       java.lang.CharacterDataLatin1::getProperties (11 bytes)
     82   17       3       java.io.WinNTFileSystem::isSlash (18 bytes)
     84   16       3       java.lang.AbstractStringBuilder::append (29 bytes)
     84   18  s    3       java.lang.StringBuffer::append (13 bytes)
     85   14       3       java.lang.Math::min (11 bytes)
     86   19       3       java.lang.StringBuilder::append (8 bytes)
     88   20       3       java.lang.String::getChars (62 bytes)
     90   22       3       java.lang.String::indexOf (70 bytes)
     91   21       3       java.util.Arrays::copyOfRange (63 bytes)
     92   23       3       java.lang.System::getSecurityManager (4 bytes)
Hello World
PrintCompilation を使用することでコンパイルされて実行されたメソッドがわかります。
この出力の詳細についてはStackOverflowとかにありますが、せっかくなのでOpenSDKのソースコードを見てみることにします。
Java8のソースコードは以下から取得可能です。
https://download.java.net/openjdk/jdk8u40/ri/openjdk-8u40-src-b25-10_feb_2015.zip
このコード中でPrintCompilationを付与した際に出力される内容を作成していると考えられる下記のコードをみてみます。
openjdk\hotspot\src\share\vm\compiler\compileBroker.cpp
// ------------------------------------------------------------------
// CompileTask::print_compilation_impl
void CompileTask::print_compilation_impl(outputStream* st, Method* method, int compile_id, int comp_level,
                                         bool is_osr_method, int osr_bci, bool is_blocking,
                                         const char* msg, bool short_form) {
  if (!short_form) {
    st->print("%7d ", (int) st->time_stamp().milliseconds());  // print timestamp
  }
  st->print("%4d ", compile_id);    // print compilation number

  // For unloaded methods the transition to zombie occurs after the
  // method is cleared so it's impossible to report accurate
  // information for that case.
  bool is_synchronized = false;
  bool has_exception_handler = false;
  bool is_native = false;
  if (method != NULL) {
    is_synchronized       = method->is_synchronized();
    has_exception_handler = method->has_exception_handler();
    is_native             = method->is_native();
  }
  // method attributes
  const char compile_type   = is_osr_method                   ? '%' : ' ';
  const char sync_char      = is_synchronized                 ? 's' : ' ';
  const char exception_char = has_exception_handler           ? '!' : ' ';
  const char blocking_char  = is_blocking                     ? 'b' : ' ';
  const char native_char    = is_native                       ? 'n' : ' ';

  // print method attributes
  st->print("%c%c%c%c%c ", compile_type, sync_char, exception_char, blocking_char, native_char);

  if (TieredCompilation) {
    if (comp_level != -1)  st->print("%d ", comp_level);
    else                   st->print("- ");
  }
  st->print("     ");  // more indent

  if (method == NULL) {
    st->print("(method)");
  } else {
    method->print_short_name(st);
    if (is_osr_method) {
      st->print(" @ %d", osr_bci);
    }
    if (method->is_native())
      st->print(" (native)");
    else
      st->print(" (%d bytes)", method->code_size());
  }

  if (msg != NULL) {
    st->print("   %s", msg);
  }
  if (!short_form) {
    st->cr();
  }
}
1列目はタイプスタンプが出力されます。
2列目はcompilation_idとmethod_attributesです。cocmpilation_idは4桁の数字です。
method_attributesはフラグの組み合わせで以下のように表示されます。
| 文字 | 条件 |
|---|---|
| % | OCRメソッドの場合.enum型のMethodCompilationが定義されていてInvocationEntryBciとInvalidOSREntryBciがあって、このInvalidOSREntryBciの場合 |
| s | synchronizedの場合 |
| ! | exception_handlerを持つ場合 |
| b | blockingの場合 |
| n | nativeコードの場合 |
3列目はTieredCompilationがONの場合、コンパイルレベルが表示されます。
このTieredCompilationについては-XX:-TieredCompilationまたは+XX:-TieredCompilationオプションで制御できますが、Java8の場合デフォルトはONです。
コンパイルレベルは以下のようになります。
| level | 内容 |
|---|---|
| 0 | interpreter |
| 1 | C1 with full optimization (no profiling) |
| 2 | C1 with limited profiling |
| 3 | C1 with full profiling |
| 4 | C2 |
つまり、同じC1といっても3段階に分かれています。
4列目はメソッド名が出力されます。
さて最初の-XX:+PrintCompilationの出力結果を見てみましょう。
そこにはHelloWorldクラスのmainは含まれいないので、そこのコードはインタプリタで実行されていることがわかります。
マシンコードにコンパイルされているとかいっても、その内容はみえないの?
C1,C2でコンパイルして作成されたマシンコードはファイルに出力されるわけでもなくメモリ上に存在するだけです。
この内容を確認するにはいくつかの手順が必要です。
まず、逆アセンブラができるhsdis-amd64.dllを入手します。
Windowsの場合は以下からダウンロードできるでしょう。
https://sourceforge.net/projects/fcml/files/
DLLをダウンロードしたら、そのDLLにパスを通してください。
その後、以下のコマンドを実行します。
java -XX:+UnlockDiagnosticVMOptions -XX:+TraceClassLoading -XX:+PrintAssembly -XX:+LogCompilation HelloWorldカレントディレクトリにlogファイルが作成されて、どんなマシンコードを作ったか閲覧できます。
出力例
Decoding compiled method 0x0000000002d00750:
Code:
RIP: 0x2d008a0 Code size: 0x000001f0
[Entry Point]
[Constants]
  # {method} {0x00000000192f4fc0} 'hashCode' '()I' in 'java/lang/String'
  #           [sp+0x40]  (sp of caller)
  0x0000000002d008a0: mov     r10d,dword ptr [rdx+8h]
  0x0000000002d008a4: shl     r10,3h
  0x0000000002d008a8: cmp     r10,rax
  0x0000000002d008ab: jne     2c35f60h          ;   {runtime_call}
  0x0000000002d008b1: nop     word ptr [rax+rax+0h]
  0x0000000002d008bc: nop
[Verified Entry Point]
  0x0000000002d008c0: mov     dword ptr [rsp+0ffffffffffffa000h],eax
  0x0000000002d008c7: push    rbp
  0x0000000002d008c8: sub     rsp,30h
  0x0000000002d008cc: mov     rax,193e7ac8h
  0x0000000002d008d6: mov     esi,dword ptr [rax+8h]
  0x0000000002d008d9: add     esi,8h
  0x0000000002d008dc: mov     dword ptr [rax+8h],esi
// 略
ログファイルが大量でみずらい・・・
マシンコードを出力したログファイルは大量に情報が出力されていて、目的の情報をみつけるのにも苦労するでしょう。
この場合、JitWatchで閲覧するとよいでしょう。
https://github.com/AdoptOpenJDK/jitwatch/
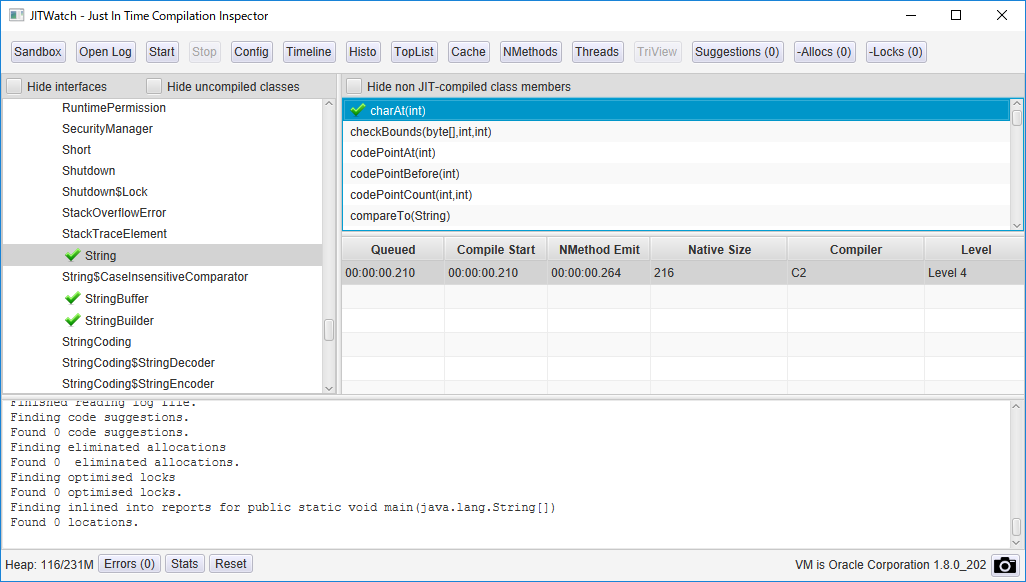

詳しい使い方は以下を参照してください。
JITWatchでJITコンパイルを見よう!
https://www.sakatakoichi.com/entry/2014/12/04/202747
インタプリタは、どうやってバイトコードを解釈しているのか?
いままでで、HelloWorld::mainはインタプリタで動作していることがわかりました。
では以下のgetstatic~returnといった命令は、具体的にどこで、どうやって処理されているのでしょうか?
  public static void main(java.lang.String[]);
    descriptor: ([Ljava/lang/String;)V
    flags: ACC_PUBLIC, ACC_STATIC
    Code:
      stack=2, locals=1, args_size=1
         0: getstatic     #2                  // Field java/lang/System.out:Ljava/io/PrintStream;
         3: ldc           #3                  // String Hello World
         5: invokevirtual #4                  // Method java/io/PrintStream.println:(Ljava/lang/String;)V
         8: return
}
この謎を解明しようとOpenSDKのソースコードを漁っていた調査班はついに、その該当箇所を発見しました。
getstaticや、ldcなどの命令は解釈と実行はbytecodeInterpreter.cppのrunWithChecks()/run()で行っているのを発見したのです。
/*
 * BytecodeInterpreter::run(interpreterState istate)
 * BytecodeInterpreter::runWithChecks(interpreterState istate)
 *
 * The real deal. This is where byte codes actually get interpreted.
 * Basically it's a big while loop that iterates until we return from
 * the method passed in.
 *
 * The runWithChecks is used if JVMTI is enabled.
 *
 */
# if defined(VM_JVMTI)
void
BytecodeInterpreter::runWithChecks(interpreterState istate) {
# else
void
BytecodeInterpreter::run(interpreterState istate) {
# endif
  // 略
# ifndef USELABELS
  while (1)
# endif
  {
# ifndef PREFETCH_OPCCODE
      opcode = *pc;
# endif
      // Seems like this happens twice per opcode. At worst this is only
      // need at entry to the loop.
      // DEBUGGER_SINGLE_STEP_NOTIFY();
      /* Using this labels avoids double breakpoints when quickening and
       * when returing from transition frames.
       */
  opcode_switch:
      assert(istate == orig, "Corrupted istate");
      /* QQQ Hmm this has knowledge of direction, ought to be a stack method */
      assert(topOfStack >= istate->stack_limit(), "Stack overrun");
      assert(topOfStack < istate->stack_base(), "Stack underrun");

# ifdef USELABELS
      DISPATCH(opcode);
# else
      switch (opcode)
# endif
      {
      CASE(_nop):
          UPDATE_PC_AND_CONTINUE(1);
      // 略
      }
    }
  }
}
これはメソッド中の全てのバイトコードを実行するまでwhileでループし、命令コードに合わせてCASE区で分岐されて実行されています。
たとえばgetstaticは以下のような実装になっています。
getstatic
      CASE(_getfield):
      CASE(_getstatic):
        {
          u2 index;
          ConstantPoolCacheEntry* cache;
          // 注釈:現在のバイトコードの位置pc+1から2バイトデータを取得してindexに格納する
          index = Bytes::get_native_u2(pc+1);

          // QQQ Need to make this as inlined as possible. Probably need to
          // split all the bytecode cases out so c++ compiler has a chance
          // for constant prop to fold everything possible away.
          // 注釈:constatnt_tableからindexを指定して値をとる。
          cache = cp->entry_at(index);
          if (!cache->is_resolved((Bytecodes::Code)opcode)) {
            CALL_VM(InterpreterRuntime::resolve_get_put(THREAD, (Bytecodes::Code)opcode),
                    handle_exception);
            cache = cp->entry_at(index);
          }

# ifdef VM_JVMTI
          if (_jvmti_interp_events) {
            int *count_addr;
            oop obj;
            // Check to see if a field modification watch has been set
            // before we take the time to call into the VM.
            count_addr = (int *)JvmtiExport::get_field_access_count_addr();
            if ( *count_addr > 0 ) {
              if ((Bytecodes::Code)opcode == Bytecodes::_getstatic) {
                obj = (oop)NULL;
              } else {
                obj = (oop) STACK_OBJECT(-1);
                VERIFY_OOP(obj);
              }
              CALL_VM(InterpreterRuntime::post_field_access(THREAD,
                                          obj,
                                          cache),
                                          handle_exception);
            }
          }
# endif /* VM_JVMTI */

          oop obj;
          if ((Bytecodes::Code)opcode == Bytecodes::_getstatic) {
            // 注釈:constant_table[2]のクラス情報を取得してobjに入れる
            Klass* k = cache->f1_as_klass();
            obj = k->java_mirror();
            MORE_STACK(1);  // Assume single slot push
          } else {
            obj = (oop) STACK_OBJECT(-1);
            CHECK_NULL(obj);
          }

          //
          // Now store the result on the stack
          //
          TosState tos_type = cache->flag_state();
          // 注釈:constant_table[2]のフィールド情報を取得してfield_offsetに入れる
          int field_offset = cache->f2_as_index();
          if (cache->is_volatile()) {
            if (support_IRIW_for_not_multiple_copy_atomic_cpu) {
              OrderAccess::fence();
            }
            if (tos_type == atos) {
              VERIFY_OOP(obj->obj_field_acquire(field_offset));
              SET_STACK_OBJECT(obj->obj_field_acquire(field_offset), -1);
            } else if (tos_type == itos) {
              SET_STACK_INT(obj->int_field_acquire(field_offset), -1);
            } else if (tos_type == ltos) {
              SET_STACK_LONG(obj->long_field_acquire(field_offset), 0);
              MORE_STACK(1);
            } else if (tos_type == btos) {
              SET_STACK_INT(obj->byte_field_acquire(field_offset), -1);
            } else if (tos_type == ctos) {
              SET_STACK_INT(obj->char_field_acquire(field_offset), -1);
            } else if (tos_type == stos) {
              SET_STACK_INT(obj->short_field_acquire(field_offset), -1);
            } else if (tos_type == ftos) {
              SET_STACK_FLOAT(obj->float_field_acquire(field_offset), -1);
            } else {
              SET_STACK_DOUBLE(obj->double_field_acquire(field_offset), 0);
              MORE_STACK(1);
            }
          } else {
            if (tos_type == atos) {
              // 注釈:constant_table[2]のクラスのフィールドを取得してその結果をオブジェクトとしてスタックに格納する。
              VERIFY_OOP(obj->obj_field(field_offset));
              SET_STACK_OBJECT(obj->obj_field(field_offset), -1);
            } else if (tos_type == itos) {
              SET_STACK_INT(obj->int_field(field_offset), -1);
            } else if (tos_type == ltos) {
              SET_STACK_LONG(obj->long_field(field_offset), 0);
              MORE_STACK(1);
            } else if (tos_type == btos) {
              SET_STACK_INT(obj->byte_field(field_offset), -1);
            } else if (tos_type == ctos) {
              SET_STACK_INT(obj->char_field(field_offset), -1);
            } else if (tos_type == stos) {
              SET_STACK_INT(obj->short_field(field_offset), -1);
            } else if (tos_type == ftos) {
              SET_STACK_FLOAT(obj->float_field(field_offset), -1);
            } else {
              SET_STACK_DOUBLE(obj->double_field(field_offset), 0);
              MORE_STACK(1);
            }
          }
          // getstaticの3バイト先の命令を実行する。
          UPDATE_PC_AND_CONTINUE(3);
         }
// Have to do this dispatch this way in C++ because otherwise gcc complains about crossing an
// initialization (which is is the initialization of the table pointer...)
# define DISPATCH(opcode) goto *(void*)dispatch_table[opcode]
// 略
# define UPDATE_PC_AND_CONTINUE(opsize) { \
pc += opsize; opcode = *pc; \
DO_UPDATE_INSTRUCTION_COUNT(opcode); \
DEBUGGER_SINGLE_STEP_NOTIFY(); \
DISPATCH(opcode); \
}次の命令を実行する場合はDISPACHが実行されます。
これはgoto文になっており、命令用のラベルにジャンプすることで次の命令を実行しています。
このようにインタラプタに関しては、このコードを起点に見ていけばなんとなくどんな処理をしているかの雰囲気はつかめそうです。
この時点で3万文字こえているのでこれ以上解析した情報をまとめて乗せるのはつらいお
まとめ
今回は初心に戻ってHelloWorldがどのように動作するか見てみました。
「百聞は一見にしかず 百見は一触にしかず」とは言いますが、すみません、HelloWorldなめてました。
すごくめんどくさかったです。
参考:
Demystifying the JVM: Interpretation, JIT and AOT Compilation
https://metebalci.com/blog/demystifying-the-jvm-interpretation-jit-and-aot-compilation/#disqus_thread
DEMYSTIFYING THE JVM: JVM VARIANTS, CPPINTERPRETER AND TEMPLATEINTERPRETER
https://metebalci.com/blog/demystifying-the-jvm-jvm-variants-cppinterpreter-and-templateinterpreter/#disqus_thread
JITWatchによるJava JITコンパイルの調査
https://www.oracle.com/webfolder/technetwork/jp/javamagazine/Java-MA15-Architect-newland.pdf
JITWatchでJITコンパイルを見よう!
https://www.sakatakoichi.com/entry/2014/12/04/202747
[Java]〈Hello World〉をバイナリエディタだけで使って出力させてみた
https://tech.recruit-mp.co.jp/etc/java_class_hello_world/